July 28, 2013

Winner of the Christmas Tree Topiary Pillow Kit

Maybe you recall...
when I introduced my free tutorial for
I also offered a giveaway.


To enter, I only asked for a favorite
type of Christmas cookie.
I got hungry reading all of those comments.
It looks like Shortbread cookies are very very popular,
especially at Christmastime.

{These are my own Spritz cookies...they kind of taste like shortbread, right?}


I did a random number generator thingy
to select my winner...
lucky #27 prefers fudge over any cookie.
She suggested it could be shaped,
to make it LOOK like a cookie.

Great idea, right?
I'm sending out the prize kit to Shawn,
and I bet she'll use that imagination,
to make something really super special for Christmas!

In the little kit,
I've included everything I could think of,
so Shawn can make up her own Christmas Tree Topiary pillow.


There's all kinds of fusible stuff here:  fleece,
interfacing, and webbing.

Fabrics are from several different lines...
Glace by 3 Sisters, Joy by Kate Spain,
and Cherry Christmas by Aneela Hoey,
all for Moda.

There's even a bright red zipper, for the backing.

Oops...no PILLOW!
I'm tucking in a gift card for JoAnn's,
and at least Shawn should be able to order a pillow form
online, if there is no store nearby.

Have fun, Shawn...
and thanks to all the rest who played along!

{If you didn't win, you can still make your own pillows using my tutorial.
There's plenty of time!}


Merry Christmas in July!
Pin It

July 25, 2013

Template-Free Polka-Dot-Cafe Block

I made a promise, and I'm keeping it!
Today I'm sharing how to make a 
template-free, no-fuss, perfectly-pointed block
from the Polka-Dot-Cafe Apron project
featured in Patchwork, Please! by Ayumi Takahashi.

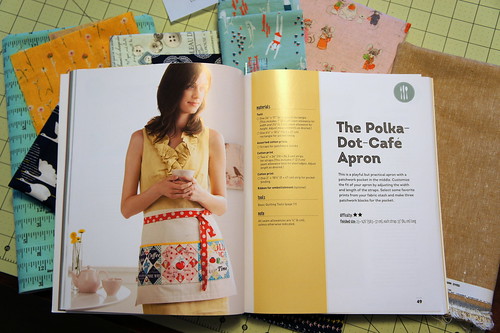
Photo Credit:  Cut to Pieces blog
The apron was one of the projects that I loved most,
when I first paged through the book.
That block design is just so adorable!


But, alas...I felt more than a little bit inadequate
when my lovely blocks were stitched together.
As careful as I was, my points disappeared into the seams
when I trimmed the blocks and stitched them together.
I was not alone...almost everyone else in the Zakka 2.0 sew along
expressed some degree of frustration, too.


I vowed to try again someday, to figure out a better way.
Recently I decided to draft the block,
using some "round" numbers and see if I could have better luck.

These are the "finished" measurements I used to draft my block, so I added 1/2" to each element.
 The final block is 6 1/2" square.
It worked!
I'm pleased to show you my method,
if you'd like to make this design, too, without templates.

Fabric Selection:

For my blocks, I used (1) center block A
and (4) contrasting block A pieces surrounding the center.

I used another fabric for all (4) of the small B blocks.

For the remaining triangle pieces, C and D,
I used the same fabric throughout.

Here's how my first trial block turned out,
made in Christmas prints for "Christmas In July".


Cutting Measurements:
NOTE:  I added 1/2" to each of the elements of the block
A  (5) 2 1/2" squares - the center square is of a different print
B (4) 1 1/2" squares
C (4) 2 1/4" squares, cut diagonally to make 8 triangles
D (2) 3" squares, cut diagonally to make 4 triangles for corners

I found it easier...and prettier...to cut out
the pieces for several blocks.


Let's get started with the sewing process for one block...

First, sew one of the 2 1/2" contrasting side blocks A to each side
of the center 2 1/2" block A.

Press the seams toward the center block.


Following the sketch in the earlier photo,
match up the corner of one small triangle C 
to the corner of the first B square.
Stitch all the way along one side of the triangle.
For part of the stitching, there will be only one layer of fabric,
since the triangle edge is longer.

Chain-piece all four of the small B squares in the same direction.


Press all of the seams away from the B squares, toward the C triangles.


Add the other small C triangles to the small B squares,
 in the same way as before.


Chain-piece all four sections, 
with the corners matched to the right angles of the triangles.


Press the seams away from the B squares, toward the C triangles.
Clip away the excess fabric from the back.


Next, lay out the remaining pieces
in a modified 9-patch, so that they are positioned properly.


Sew the triangle sections to the large square A pieces,
to make 3 rows.
Press the seams in the top and bottom rows
toward the triangle sections,
and away from the center squares.

Now the seams will nest together, as you stitch together the 3 rows.


For the last step,
add the large D triangles to the four corners of the block.

Make sure the corner triangles are centered over the edges,
and stitch them into place.


Here's how it looks when they are sewn on.
Trim the excess fabric from the outside edges,
and press the block well.


Trim the finished block to 6 1/2" square.
Line up the 3 1/4" marks with the points of the 1" squares,
so that your block is symmetrical.


Looky there, at all of those perfect points!
Admire your beautiful block,
and make more!


Stop back soon to see what I made with my new blocks!

Pin It

July 24, 2013

Beach Huts Mug Rug

Although we don't live very close to the ocean,
we try to get away for a beach vacation,
every couple of years.

We've just come back from Ocean City, MD!


This year, when I strolled along the shore,
I waved a big "hello" to my friend Amanda,
who lives just Across the Pond.


Have you seen Amanda's library of mug rug patterns on Craftsy?
Here's the one I love most for summer.


Photo:  Beach Huts Mug Rug Pattern by The Patchsmith

To keep our happy beach memories going,
I've made my own Beach Huts mug rug,


True to form for Patchsmith patterns,
 this was a quick and easy finish,
once I decided on which fabrics to include.


I started with a background of gray and sand colors,
instead of the recommended sky blue.
Once I got some of the applique pieces
into place, it began to look more lively.


I love the navy, gray and orange color scheme.

The little huts were so much fun to stitch.


My most favorite little detail was the pair of seagulls!


I kept the back simple,
using a coordinating maritime fabric
from Anchors Aweigh by Dear Stella.

{You may remember a previous post featuring this fabric in a purse.}


When the weather cools off,
and fall approaches,
I'll enjoy using my mug rug while I remember
long summer days.


are available on Craftsy!
You'll love the designs, no matter which patterns you choose.

{What shall I make next time?}


Pin It

July 17, 2013

And Now A Word From Our Sponsors...

OK...I'll be honest...
I don't have any sponsors!

{But I'd love to have sponsors, if anyone out there is interested!}

Still, I think it's fair to warn you that I'm
doing some advertising in this little post.
I just have to tell you about some great lower prices,
for my original downloadable PDF patterns!

These prices are available in my pattern shop on Craftsy...


Are you looking for a casserole carrier pattern?
Aunt Ellie's Casserole Carrier 
has a clever design that works for any dish...
pie plates, oval baking dishes,
round casserole dishes,
or even a 9" x 13" cake pan!

What a great gift idea for new grads, brides, moms
or birthday girls!

It's on sale for just $5.


If you'd like to make a customized cover
for an ereader, iPad, or tablet,
you'll love the stylish Linen Pocket Ereader Cover.
An easy-to-use worksheet eliminates the guesswork,
and you'll end up with a perfect fit every time,
no matter what brand or size the device.


Everyone needs a vacation from time to time...
and the Anita Vacation tote makes it even more fun and practical.
You won't believe you've made
this soft and sturdy bag yourself, with professional detailing.
Lots of pockets keep you organized, no matter where you're going.


Lastly, both of my mug rug patterns
are now available at only $2 each on Craftsy and Etsy.

My Tumbler Mug Rug is pieced with the classic shape.


My latest Celebrate Mug Rug design uses
a simple and festive bunting to inspire celebrations
big and small.


Also, just so you know...
Enjoy great savings  of up to 75% off 
on fun and informative classes!


You can be stitching as quickly as you can shop,
with instantly available downloads.
Try one today!

If you make something from my patterns,
I'd love to have you share photos in the Flickr group,
Pin It

July 13, 2013

JOY in July - A Christmas Bunting

It's beginning to look a lot like...
Christmas in July!


That's our chosen theme for the Across the Pond Sew Along...


and it's also the reason for a fun blog hop

{I've already posted my Christmas Tree Topiary Pillow for the blog hop here.}


has come up with not one, 
but TWO free bunting patterns for her July contributions!

Gingerbread Bunting by The Patchsmith
JOY Bunting by The Patchsmith
I decided to make the JOY bunting for our living room.
I used scraps from Glace, an older Christmas line
by 3 Sisters for Moda.

{I love the aqua, brown and red floral and holly prints.}


I love how quickly this project came together.
I'm pretty sure I had it all finished in less than an hour.

The fusible applique was very simple.
I just stitched along the edges of the applique pieces.


I didn't have the shade of ribbon I wanted,
so I just sewed the pennants to a long piece of aqua binding,
taco-style.

{I just tucked the pieces between the folds, pinned into place,
and stitched along one edge.  Easy!}


This decoration will be so easy to store until Christmastime.
Look at my little bundle of JOY!


If you want to, you could add more pennants,
to make it as long as you like.


Today I'm decking the deck with boughs of holly.


This winter I should take new photos,
with snow, instead of grass, in the background.


I hope you'll join us and stitch up something
for Christmas in July.
You can add your photos to the ATPSA Flickr group.

If your December is super busy, like most people I know,
you won't be sorry you've planned ahead!


Pin It