Pages

September 30, 2016

Saltwater Mini Quilt

Hello, Friends!
I've been back at the sewing machine,
and I've got lots of new things to show you.
 Today I'm sharing my Saltwater Mini Quilt,
made from the pattern by Thimbleblossoms.


I was craving a mini quilt, 
and this design looked like such fun to make.
I was not disappointed when I made it
from a few fat quarters of Hello Darling
by Bonnie and Camille.


I made this block first, and I was hooked.
The apple green looks so sweet with the
pink strawberry print.


Hmmm...I wasn't sure I liked the "busy" blocks...
but they've grown on me.


They're just little blocks, so they have to grab attention.


This one is actually my favorite, with the dots.


I put them all into place, with some bright white sashing.


For the quilting, I used some wavy lines.


This type of quilting is my new method of choice.


I think I like the lines going horizontal on this project.


This mini quilt would make a cute topper for a small table.
It would fit in with modern Christmas decor,
but it's just right for any season.


Have you made any mini quilts lately?
I can't wait to make some more!


and 

September 17, 2016

Little Ruby Table Topper

Hello, Friends!
I have a little table topper to share today.
I made it from a Mini Charm pack of Little Ruby
by Bonnie and Camille for Moda.


I didn't have a pattern for this table topper,
but I was definitely inspired by Sherri from A Quilting Life.
showing a sweet way to lay out the squares on point.

I had just received my mini charm pack,
and I just "needed" to make something with it.
I cut some a whole bunch of 2 1/2" white squares,
and in almost no time I had the quilt center finished.


I really LOVE the way that many designers
use a color palette that blends one fabric collection
with other lines that they've produced.
It makes it so easy to finish precut projects,
even when you don't have yardage from the same line.
I used a fat quarter from Hello Darling
to create a mitered border.


There were only a few squares left over
from the mini charm pack.
I used those to make a pieced backing.
I chose a piece of blue scallop fabric from
the original Ruby line, for the rest of the backing.


For the binding, I chose a bias stripe
from a fat quarter of Hello Darling.


I think this topper looks pretty on the front...


and on the back, too!


{I really love pieced backings...don't you?}


Sometimes you just feel the need to create.
Those mini charms will burn a hole in my sewing stash,
if I don't make something with them soon.


This project was so enjoyable that 
would not mind stitching up a bunch of them
into table toppers like this.


What do you like to make with your mini charms???

Linking up with Fabric Frenzy Friday!


September 10, 2016

Perfectly Pleasing Pincushion Parade - 2016

I love a good parade!!!
You may have noticed that I love a good pincushion, too.


and I'm joining up!
YOU can join, too!!!
There are lots of great prizes to be won,
and you'll get a chance to make new pinnie friends.


This would be a very long post indeed if I were to share
ALL of my pincushions,
but I'll showcase a few of my favorites.
If you click the links, you can see more details about each pinnie.

Here's one I made from the Zakka Style Sew Along.
I loved seeing how others used the same simple pattern,
creating dozens of beautiful interpretations.


In my opinion, the best pincushion tutorial ever written
was for the Cathedral Window Pincushion
by GoGo Kim. 

I made my first one from the puppy prints
of Sherbet Pips by Aneela Hoey for Moda.


I've made literally dozens of these,
usually in batches of 3 or 4.
This set was a favorite of mine, made this year.


I can't stop...they are like my "comfort" food.
I make them whenever I just need to create something pretty,
for my own happiness.


I like to give them as gifts,
and you may see them popping up in Blogland sometimes.


I also love to sell them in my shop on Etsy.
I LOVE making them as a custom order.


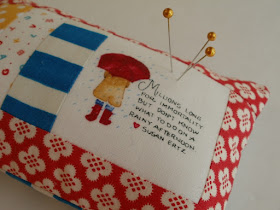
My Susan Branch pincushions are just as much fun to make.
This one is mine to keep and use.


I've made lots more to give and sell.


Before you ask...I don't have a source for any more of the
Susan Branch images. Maybe someday, she'll make more!
Wouldn't that be awesome?!?!?!?!?
They are truly amazing and add so much to a little pinnie.


Have you heard of the Skinny Pinnie???
I hosted a swap for these, and it was super fun!
Here's the one I received...so precious,
with teensy handstitched hexies in adorable prints!!!


And here's the one I sent to my partner.


Pinnies are one of my favorite gifts to receive.
My sister from Susie's Sunroom made this pincushion for me,
and I use it all the time, as one of my main pinnies.
I station 3 or 4 of them around the room while I sew.


I fully intend to make many more pincushions.
You can never have too many!


I hope you enjoyed my entry in the 
Perfectly Pleasing Pincushion Parade.
Be sure to visit all of the other posts to see
some fabulous pinnies!
There's still time to link up to join the parade!


On a personal note...

As a proud band mom,
I get the chills as I see our high school band
marching down the hill toward the football stadium.
The drum cadence grabs everyone's attention,
and we watch 200 musicians and bandfront marching onto the field.
This year, one of our sons is a drum major,
which makes it super fun to be a band mom.


As another anniversary of September 11 passes,
I am so thankful that my sons have been able to participate
in lots of traditionally patriotic events like parades.
I hope the American flag will always hold meaning in their hearts,
and that they will always appreciate the freedom that it represents.

September 5, 2016

Project Sweetwater - Solids - Part I

Hello, Friends!
 Earlier this summer I got a fun box in the mail,
from Project Sweetwater.


Even though I ordered it for myself,
it was very exciting to have it delivered.
Inside, I found all of the things that were promised,
and a few little fun surprises.


The star of the show was this amazing
bundle of solids, curated by the girls of Sweetwater.


I couldn't stop taking pictures of it...
this bundle looks so smart and inviting,
yet I hated to unwrap that pretty ribbon.


There was a project booklet filled with tempting blocks
that could be created from these awesome colors.
Oh, yes...I had to open the bundle and get started.


I love the simple graphic designs of the projects.
I'm taking my time, since my hand is still not strong,
but this is good therapy.


I'm sharpening my skills,
and next time I'll show you some things I've discovered
about sewing with accuracy.


Until then...
enjoy another pretty bundle photo!