May 17, 2012

Zakka Style Rain Cloud Mug Rug

Welcome again to the weekly edition of the
Zakka Style Sew Along!
{For more information, visit LRStitched.}


This one is the perfect project for a rainy day...
the Rain Cloud Mug Rug.

{For my mug rug, I did not stray far from the one featured in the book,
made by contributing artist Christie Fowler.
I thought hers was so adorable!}

Here is the one I made...


There was one major departure...
I did not use even a scrap of linen for my mug rug.

{I hope that's legal!}

For the background
I chose a solid in Mist from Amy Butler.


That reminded me of a piece of Amy Butler's
Midwest Modern
that I'd recently purchased.
The tiny gray polka dots were perfect for the fussy cut cloud!


It's called Optic Blossom Linen.

{Hey..."Linen"...does that count?!?!?!}


For me, the most fun part was machine quilting the wind and rain lines!
For the rain lines,
I used masking tape to mark a few parallel slants.
I stitched those first, using the white thread.
Then I filled in with some more rainy lines, in gray thread.

{I just eye-balled my windy swirls, modeling them after the book photo.}


I'm pretty pleased with my machine binding...
I used more of the Optic Blossom for that.

{I just love the little bits of sunshine that the yellow brings!}


I love the back just as much as the front, actually...
that's a piece of Nicey Jane by Heather Bailey,
in soft blue with yellow.


This is a gift for my sister, Susie.
I got to give it to her in person today!
I owed her a mug rug, because she's made 
a few cuties just for me.
Here's the latest...for teatime!
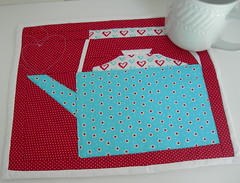


I put my little eamylove label on the back, so Susie knows
I made it, just for her!


I hope it will bring a little smile to Susie, even on rainy days!


{Love you, Susie!}


Pin It

May 14, 2012

My Sewing Space

Do you have a sewing studio,
or a room in your home that is
dedicated to your creative impulses?

{You are so lucky!!!}

{Pinterest image from houzz.com}

Or are you like me?

{I sew in my dining room.  Have for years.}


You know what?  I think I've ALWAYS sewn in the dining room.
I started sewing while I was in junior high school, 
and I guess I even used my mom's dining room back then.


I've never had a "sewing room"
{or a fireplace, or a kitchen island}
even though my wish list would never be complete 
without those items!

MY WISH LIST looks like this:

{Pinterest image from purestylehome.blogspot.com}


{Pinterest image from themeadowbrookblog.blogspot.com}


{Pinterest image from decor8blog.com}

But I've done okay all this time, setting up my stuff
over and over again for sewing,
and taking it down again for company...
or holidays.


I'm the kind of person who might not clean it all up, 
from time to time, if I didn't have to!
And I can prove it, because you ought to see the place(s)
where I store all my stuff when I'm NOT sewing in the dining room!

{No pictures available}

All these years while I've been sewing in the dining room,
I've been able to cook, because I'm next to the kitchen...
And I can talk to my boys while they do homework or relax...
And I can listen to the news with my husband...
Or get up in the middle of sewing to take our dog outside!


Even though I've begged for this for a really long time,
I realized not too long ago that I really don't want
to have a sewing room in our basement.
The dining room is kind of "working" for us.


{This kinda looks a bit boring, day after day after day...}


The other day, I had a good idea, and I thought I'd show it to you:


For years now, I've collected these boxes, without ever really knowing why I had to have them.  They were stored in a closet until now.


I brought them out to a place of honor in...the dining room.


Now they hold items I need for my projects...
hardware for bags and purses...


ribbons and trims...
charm squares and scraps...
needles and pins, etc.


I can't remember which one is which,
so I had to label them inconspicuously. 
;)


I love the way they make my dining room look 
just like a sewing studio...
in my eyes.


That being said, if we would ever add on a room to our house,
right next to the kitchen and all the other activity,
I'm gonna sew in it all the time!


{I'd let everyone else use it once in a while,
but they'd have to clean it up,
so I could have "my sewing room" back!}


Pin It

May 8, 2012

Zakka Style Itty Bitty Quilt Block Magnets

Are you still sewing along with Zakka Style?
I am...can't believe I'm keeping up
with this pace, but it's so much fun!

{Come along with us...details are at LRStitched!}


This week I made something that I'm keeping
for myself!

{All of my other Zakka Style projects have been listed for sale in my shop on Etsy, eamylove.}


They really ARE Itty Bitty Quilt Block Magnets! 
They finish at only 1 1/2" square!

This chapter's contributor is Nova Flitter,
who blogs at acuppaandacatchup.com.
Go and say hello to her lovely posts!

Adrienne of Little Bluebell  - another beautiful blog - 
has her own version posted this week for the Sew Along.
She has some great tips for this project!

{I'm going to give you my tips, too!}


One of the coolest things about this project is 
that you barely need any linen at all.  
Here is the scrap I used.  
I actually had enough to make all 6 magnets from this little bit!

{I actually considered...briefly...throwing this irregular bit away!  OMGosh!!!}


I cut all my linen pieces out first.
I used my favorite...100% European linen in Oatmeal.

{CONFESSION:  I cut my pieces for the triangles a tiny bit larger than the directions, 
rounding up to the nearest 1/4".  
That allowed me to cut the HST's to the perfect size when I squared them up.}


Next I cut all of my prints...
I kept them organized, in little stacks,
one for each block.

{I used coordinates from my Winter Dresden Quilts project...still a WIP, but coming along.
The gingham is from Strawberry Fields by Fig Tree Quilts.  The floral is from Martinique by 3 Sisters, and on the back I used one of my Winter scraps from Minick and Simpson for Moda.}


The BEST tip from both Nova and Adrienne was to shorten the stitch length.
It made it so much easier to stitch without the wee blocks shooting through my sewing machine.  

I squared up my pieces everytime I could...
BEFORE finishing each block, and AFTER.

{I LOVE this tiny block!}


Here they are, all done.
They were actually pretty perfect!
I was having fun now!!!

{They are not quite flat in this photo.}


You know me...I use Pellon 987F Fusible Fleece by the bolt.
I diverged a bit from the instructions and used that, instead of regular batting.
I thought the blocks looked very sweet the way they were, 
so I did not do the quilting, as the book suggested.

{I can't believe I'm admitting this...I thought about leaving this block out, 
because I didn't feel like  printing out a paper-piecing template.  
Turns out you don't need one!
And this one is now my very favorite one of all.
And it was THE MOST FUN to stitch!}


When it was time to turn the teeny blocks
right side out, I was sooooo glad I'd used the fusible fleece!
It helped to hold my little stitches in place
during this stressful process.

I used Darice Super Strong Ceramic Magnets
inside my blocks.  I found them at a local crafts store.

{I listened to the good advice to make sure the magnets were positioned correctly, 
so they would stick to the refrigerator!}


I love them so much...

{They are as sweet as a dessert!}


Go ahead...try them!

{But these ones are mine!}


Pin It

May 5, 2012

Mail...incoming and outgoing...and a DISCOUNT CODE!

Ever since I was a little girl,
I've loved getting something in the mail!

{Don't you?}


INCOMING...
Yesterday I received a really fun package.
I was the winner of a giveaway from
and the prized was a SIGNED copy of

{Thank you so much, Deb!}


I've only had a chance to page through it twice so far.
I have a confession:  I enjoy READING cookbooks,
sewing patterns and quilting books, 
almost as much as I love USING them!


This book promises to become a favorite of mine.
Not only did I see some must-do projects in there...


But also there is so much good information, 
particularly the chapter on color and design.
I hope to learn a lot from this book!

{And then I'll do a post with a book review.}

Included with the book was a packet of modern charm squares
I wish I lived near Seattle...it looks like a great shop!

{But they have an online catalog for "visitors" like me!}


OUTGOING...
And now for some really big news!
I've gone global...
I am now offering international shipping from 


I've met a delightful customer from Australia, 
who wanted to buy my elephant pincushion, blogged here.
She kindly contacted me to see if I might check into sending it overseas.
Soon I found out that it's very easy to set up international sales with Etsy.


The package is now on its way, with some Darla key fobs 
to keep Miss Elephant company.


{There was just enough room left in the box for a few small surprises, too!  Shhhh...} 

Now I'd like to celebrate
International Shipping from eamylove on Etsy
with a special DISCOUNT CODE COUPON!

From now through May 31,
enter SMALLWORLD15
at checkout to receive
15% off of any order, before shipping!


Pin It

May 1, 2012

Zakka Style Patchwork Pencil Case

It's Zakka Day again!

{Join us for the Zakka Style Sew Along...
Details are found at LRStitched.}


This week's project was really fun to make, 
and I LOVE how mine turned out!

The Patchwork Pencil Case was contributed by Shannon Dreval, 
who is an American-born designer who now lives near Paris, France.

Her blog, Petits Details, captures her experiences 
for those of us who may never know what it is to visit Paris.
Her images of France are inviting, 
and her photos of vintage fabrics
 and flea-market finds are equally irresistible.

{Photo from Petits Details blog}

Here is my experience with the Patchwork Pencil Case:


It took a lot of self-discipline to choose my fabrics...this project looks so beautiful in all the variations I've seen.  

{That makes it hard to stick to one idea!}


I settled on my Patisserie scraps, from Fig Tree Quilts for Moda.
I have just a few bits from a fat quarter bundle...
they are among my most precious possessions!

{I used the butterscotch and berry tones.}

For the lining, I found a long enough piece of this caramel print.

{SWEET!}


For the outer fabric, I used 100% European linen in Wheat.

{I love the texture!}


I added my "eamylove" label in a discreet spot...


One thing I loved about this project was 
that I finished it in about an hour, including cutting out the pieces.
So simple, right?


{Well...yes, but...}


 I read about the experiences of some others 
and found that "regular" pencils did not fit 
in the finished case,
if the measurements from the book were followed.


That's why I added about an inch to the length of mine.

{Regular pencils DO fit in mine...
but I like the "relaxed fit" that I got 
with mechanical pencils and markers!}


As others have noticed already,
this "pencil case" would also be a beautiful way to keep
crochet hooks or reading glasses handy!

{Want mine?  Visit my shop, eamylove, on Etsy!}


Pin It