Showing posts with label cushion. Show all posts

August 8, 2017

Coney Island Pillow

Hello, Friends!
If you're like me, you don't have a lot of free time
for sewing, especially in the summertime.
Pillows are a great project,
because they're both practical and pretty...
a smart way to use precious time!


I made this particular pillow with a mini charm pack
of Coney Island, by Fig Tree Quilts for Moda.


The colors and prints capture summer's
carefree moments perfectly.


When it came time to choose the backing,
this apple green solid caught my eye.


This little pillow measures about 14" x 14".
It's not too big...just nice for cushioning a wicker chair.


I love the way this pudgy pillow fills out the form.
It's pleasingly plump!!!


Don't you love mini charms?
I love searching for matching prints
in various colorways, when I use a charm pack
or a mini charm pack.


If you have a favorite way to spend your
summer sewing hours,
feel free to comment!

Pin It

October 2, 2016

Spooky Delights Halloween Pillow

Hello, Friends!
October is here, and while I was decorating my home,
I decided to whip up a new Halloween pillow.


I used my charm pack of Spooky Delights
by Bunny Hill for Moda.
There are so many sweet prints...
I think I love this Raven Damask the most.

Can you see the tiny black birds?


The text print was another deal-breaker for me.
Mix in a few black cats, pumpkins and mischievous mice,
and you've got a fun focal print.


Of course, there are lots of pretty polka dots
to coordinate...making this line a hit with me.


I've been practing my half-square triangle (HST)
technique, so in nearly no time,
I had whipped up the 16 HST's I needed for the pillow top.


I love that HST's can be arranged in countless ways,
to create stunning designs.
This is the layout I chose, with a diamond pattern
of low volumes around a dark center.


My finished top was about 16 1/2" square...
my pillow form was 16" on the top, but it's rather deep.
I decided to use a Bella Solid
to add a narrow coordinating border.


Often I use a covered zipper backing, but this time
I took a practical shortcut in the zipper installation.
I placed the zipper in the bottom seam of the pillow.


It doesn't show, and it will be so easy to swap out
the pillow cover for other seasons.


I chose the text print in Vanilla for the pillow backing.


The quilting on this pillow was nice and easy...
I used a grid of straight diagonal lines.


For areas that weren't "in the ditch",
I marked my lines with a Frixion pen.
You would never know, even on the white triangles...
a hot iron removed the lines after stitching.


I'm so pleased with my Halloween pillow...
and there are enough charm squares left for another
Halloween project or two!


Are you getting ready for Halloween, too?
Pin It

March 9, 2015

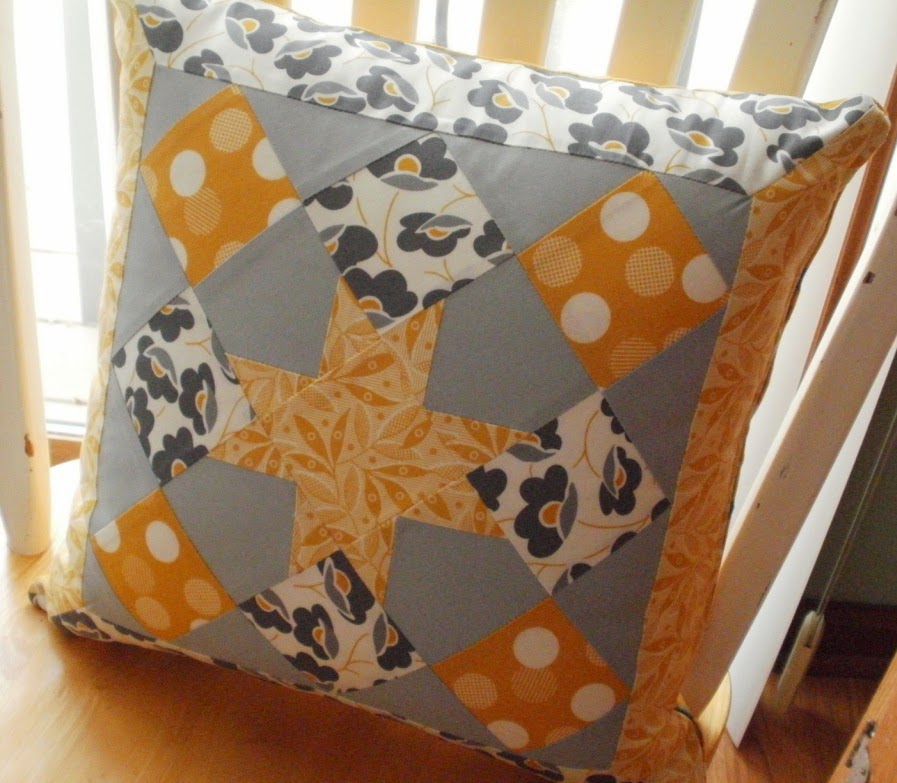
Guest Posting - Part 2 - A New Granny Star Pillow

Lucky me, to be invited again
to present another guest post over at
I've downsized the block a bit,
finishing it into another, smaller pillow.


Presenting...


I changed the color palette,
choosing the mustard yellow and gray prints
from the fabulous Color Theory bundle.


This time the block-building process is a bit different.
I assembled the block using only squares
this time, and no triangles.

{It produced a bit of waste, but nothing to be alarmed about.}


I think you'll find it very easy to make
a pillow of your own from this new tutorial.
The finished size is about 15" square...
just right for an accent pillow.


Stick with me, friends...
the little grandbaby project is coming soon!


Pin It

March 8, 2015

Simply Striped Pillow Blog Hop - It's My Turn!

It's really true how time flies when you're having fun!
It's my turn already to present
the pillow I've made for the 


Here's my pillow's front side.


Or is THIS the front???


Head over to Susie's Sunroom now,
to read all about it.

Should we have a giveaway, too???
Yes, let's!
Leave me a comment by midnight,
Friday, March 13, 2015,
telling me what fabrics you would choose
to make yourself a Simply Striped Pillow.

This giveaway has now ended.

I'll choose a random winner,
who will receive her choice of one of my patterns

Good luck,
and thanks for visiting! 
Pin It

January 15, 2015

A New Merry Christmas Pillow

As part of my ongoing
"Christmas Through The Year 2015"
project,
I proudly present my latest pillow...
Merry Christmas!


This pillow will be mine to keep!
I love the way it matches
our brown couch.


I used my 4th and last (sniff...sniff)
"ink swatch" from Sweetwater.
You may recall the other pillows I've made,
using the other 3 ink swatches.

This "Let It Snow" one really works!
We have a few inches of pretty white stuff now.


I love the sentiments on the next two pillows,
describing what Christmas really means.


I believe in Christmas!


Nothing beats a simple
"Merry Christmas" greeting, right?


For this pillow,
I used some more of my beloved Winter's Lane
fabric by Kate & Birdie Paper Co. for Moda,
in rich brown and red.


I love the way this newest pillow looks
which I made back in 2013.


If you like that topiary pillow,
you can make your own,


As usual,
I've added a covered zipper to the pillow back.
You can learn how to do that


I've made the Merry Christmas pillow
only 12" square.


I adapted the pillow backing tutorial
by cutting my backing pieces out about an inch
larger that the finished dimensions.
It's not necessary to make it exactly the right size.
Just before stitching the backing to the front,
I trim away the excess backing.

This pillow looks pretty from every angle,
with a finished covered zipper.


This petite cushion packs a lot of style
into a small space.


 I'll be sharing more Christmasy projects all year,
so please stop by often, friends!

Pin It

January 4, 2015

Christmas 2015 --- Getting Started

I'm not one for New Year's resolutions,
but I do like to formulate a plan
for my sewing focus each year.

Back in 2013,
I made a conscious effort to sew
something for Christmas every month.
By Christmastime, I had a wide variety
of gifts and decorations.

{See this post for a complete listing of my 2013 holiday projects.}


For 2015, I've made up my mind
 to keep up with Christmas sewing again.
I've got lots of Christmas fabrics in my stash,
and I'd love to see what I can make by December.

It was so gratifying to make this pillow
as a gift for a wonderful friend,
and I was reminded of how much I love handmade holiday presents.


Inspired by that red and black color scheme,
I've already made my first holiday project for this year!
I used two more of my "ink swatches" from Sweetwater,
and I whipped up a pair of holiday pillows.


The first pillow says,
"Joy To The World"...one of my favorite
Christmas carols of all.


I found some sophisticated damask
in a home dec weight at JoAnn's.
I think it sets off the ink swatch perfectly.


Also at JoAnn's, I found cherry red solid home dec fabric.
I used it for the backing of these pillows.
For this pillow, I chose a black and white floral print
for the covered zipper flap.


The second pillow of the set says "Just Believe."


The simple sentiment goes well with this classic palette.


I really love the polka dot zipper cover.
Believe me when I say this method for making
pillow backings is truly easy and versatile.
To adapt it to different pillow sizes,
just add an inch to the finished dimensions of the pillow front.
Your backing will be a wee bit oversized,
but that makes it easy to stitch to the pillow front.


So here it is, only January,
and I've got a couple of plump Christmas pillows,
all ready for next December!


Stop by again soon...
I'll be sharing yet another holiday ink swatch pillow!

Pin It