October 19, 2013

Strawberry Delights - Swap Package Received

Hello, my friends!
You are in for a sweet treat for the eyes today,
as I share some photos of the delightful package
I received in the Strawberry Swap
recently hosted by Erin from Why Not Sew? blog.

My swap partner was Karen of Sew Peachey,
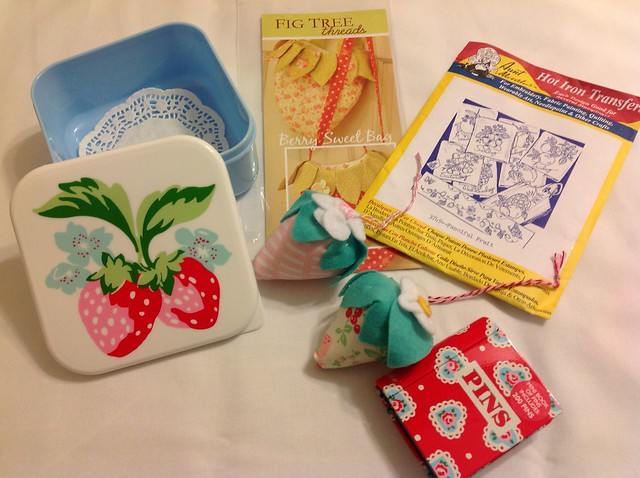
and just look at all the sweetness she sent to me!

{Notice the Strawberry chewing gum....mmmmmm!}


I was thoroughly spoiled!
Thank you sew much, Karen!
 Here's a good view of the larger 
strawberry pincushion...the Mama Berry.


I adore the way Karen added
tiny yellow buttons to the felt blossom on the cap.
It's all about the details, right?

Now check out the Baby Berry,
in all of her freckled glory!

{The sweet little red pins make my teeth hurt.}


Here are both berries lounging on some lovely
squares of Heather Ross Briar Rose fabrics...heavenly.


Have you tried this fun, free tutorial by Michelle Patterns,
Karen made one just for me,
and it's as useful as it is charming.

{It just screams, "Take me with you!"}


Dare I commit to saying this is my favorite detail?
Yep - I really really {heart} the little zipper pull
made from twill tape with ABC's.


Look inside the dumpling...the lining matches Mama Berry!


If you ever have a chance to participate 
in a swap, you should do it.  
Handmade surprises are sew special!

Just because I'm proving it's my favorite detail,
I'll close with one more look at that little zipper pull.


Pin It

October 17, 2013

Skinny Pinny for October Across The Pond Sew Along

The Skinny Pincushion is this month's
and I was really grateful to Susie of Susie's Sunroom
for picking something that is so quick to make,
fun to create, and useful!


{The free tutorial can be found here from Green Bee Designs.}

These are Susie's skinny pinnies!  Photo from Susie's Sunroom
Want to see mine?
I was tempted to use the Panoramic setting
on my camera, to capture it in its entirety.

I'll just show you some close-ups, in stages, instead.

I started out with a favorite Lakehouse button print. 


 For the main body, I used the text print
from Sweetwater's "Mama Said Sew" line.
I was "saving" this sewing print for something special,
and it does make a killer pincushion!


All the way down at the other end,
I used the red and black ricrac from
the same Mama Said Sew line.


Here it is, all in one photo!


When I made my skinny pinny,
I pieced together the fabrics for the top,
to measure about 3" x 15".
I cut a piece of the button print for the bottom
that also measured 3" x 15".
I fused some Pellon ShapeFlex SF101 interfacing
to the wrong sides of the top and bottom,
for some support.

I stitched the pieces wrong-sides-together,
leaving about a 5" opening in the center of the long side 
that would become the top of the pincushion.
My finished pinny is about 2 1/2" x 14 1/2".

Here's a trick I always use when I have to leave
an opening for turning and/or stuffing:
I stitch from the edge of the project,
straight over to the start of the seam, backstitching,
on each side of the opening.

{It's easier to show you than it is to describe it.}


Here's another tip:
after turning the pincushion right sides out,
I always give it a really good pressing,
to smooth it before stuffing.

{Now's the time to add a cute label, too, if you've got one.}


Susie and many other pincushion aficionados
swear by crushed walnut shells,
for stuffing their pinnies.
I'm allergic to walnuts myself,
so I just used plenty of polyfil to plump up mine...
just a bit.

{It's still skinny!}


Once it was stuffed, I hand-stitched the opening closed.
Now you know why I chose to make my opening
at the top of the pincushion,
where it will rarely be seen.

;)


Just for a bit of jazz, 
I added a piece of black ricrac to my skinny pinny.
I just pinned it between the top and bottom layers,
along a seam, before I stitched them together.
The ricrac is actually not stitched down,
except at the seams.
I'm hoping to find a nice new pair of scissors
that can be slipped under the ricrac when I'm not using them.


I've already enjoyed using
this little gem, and it's loaded up with many more pins
than I've shown in this photo.


From both sides of The Pond,
we hope you'll share photos
in our Flickr group, if you find  few minutes to make
your own Skinny Pincushion!


Pin It

October 9, 2013

Prettified Pincushion

This week marks the grand finale
of the Patchwork Please Zakka 2.0 Sew Along.
Debbie from A Quilter's Table
has done a magnificent job of
hosting the last half of the sew along!


They say you can't judge a book by its cover,
but as soon as I saw those Prettified Pincushions
on the front of the book,
I knew I wanted to have a copy!

For my version,
I chose lots of sunny yellow prints
from my fabric stash.
I used linen, to mimic the samples in the book.


There is just something about the texture
of the linen, paired with
smooth quilting cottons...so touchable.


The neutral linen also serves
as a calming backdrop,
enhancing the brightness of the yellows...
so exciting!


I made my pincushion quite a while ago,
but I remembered to make some notes about
my progress,
for my "likes" and "dislikes" section.

Dislikes are always first...
If you haven't made your {first}
prettified pincushion already,
make sure you add a 1/2" for the seam allowance
{1/4" on each side}
to your template piece!!!

{This is just sooooo important. The finished pieced block will be 2 1/2" square.} 

The instructions don't say when to remove
the paper from the block.
I recommend waiting until all of the 4 blocks
have been stitched together.

One more criticism I have is regarding the 
size recommendations for the scraps
used in the paper piecing.
I am stone serious when I say that
I wrote in my journal,
"You will CRY, unless you cut the pieces LARGER
than the book recommends!"

I used pieces at least this size:
4 Prints: 2 1/2" x 3"
Background Linen:  (4) 1 1/4" x 2"
(4) 2 1/2" x 2 1/2"
(8) 1 3/4" x 2 3/4"

And now for my "likes"...

I really enjoy paper-piecing once in a while,
and this was really a rewarding project
to make with that technique.
I think it would be a great project
to make, even if you've never tried it before.

Another great thing about making this project
is that you end up with a
very functional and stylish item.
The size is just right,
and it is the perfect way to explain
what is meant by "zakka".


My greatest "like" is the finished result.
I mean...just look at how CUTE it is!
The covered button adds so much charm!

{And I'm not just talking about MINE...I haven't seen one I didn't love,
as they have popped up all over the internet and blogland.}

If you've got this book,
I guarantee you will be happy
with the pincushion you prettify
from this design.


 I think I'm going to have to prettify some more pincushions!
Pin It

October 6, 2013

Strawberry Pincushion Swap - Sent

Have you ever taken part in a sewing swap?
Erin of "Why Not Sew?" blog had the great idea
to host a Strawberry Pincushion Swap,
and I joined in the fun!

Photo from Why Not Sew? blog
I loved the subject matter...
little berry bits of squeezy strawberries,
of any size or design.
This classic pincushion design always looks cute,
no matter what fabrics are used.

Susie made hers from Fig Tree fabrics,

Photo by Susie's Sunroom

There are lots of patterns out there,
and some of them are even free!

{Pictured here are the strawberries that started it all for Erin.}

Photo from Why Not Sew? blog
Flickr is a great way to have a stitching swap.
Erin made the partner assignments
and sent us the addresses for our partners.
We could check out their photostreams
to get to know one another a bit better.

Soon some sneak peeks began to appear,
and the excitement started to build.
It was so much fun to wonder
who was our partner,
and which package would appear in our mailboxes!

{Here's just one example of the creative swap sets, from Sew Berry Sweet.}

Photo by Sew Berry Sweet
It just so happens that I have had
this adorable Crabapple Hill pattern
I've used it a few times to make lovely floral pincushions,
and I thought it would be fun to make one
for my swap partner.

Photo from Crabapple Hill Studio
For the swap, I decided to use bright red prints
to make the large and small berries.


I had some pretty green felt for the tops,
and found some coordinating floss,
ricrac, and ribbon for the details.


Next I made the little wool felt needlebook.
for this project, I had a piece of
red wool felt that was not of the same high quality
as the white and green felts.

{Boy, did I notice that, as I blanket-stitched
my way around the needle book!}


Fortunately, I think the finished product looks just fine.


A high quality felt really helps to make the stitching
enjoyable, though, and it's essential for the detailed tiny pieces.

{I bought most of my good stuff from Retromama on Etsy,
and she carries many fabulous color choices.}


Once the stitching was done,
I put together some other little goodies.
There were some fun strawberry candies and cookies.


I even had a charm pack of berry-themed fabrics!


Everything just fit into my little mailing box,
and in no time, my swap gift was shipped to


Through this swap,
I've met lots more bloggy friends,
who are berry berry sweet.
I would highly recommend joining up in a swap,
if you find time in your stitching schedule.


After all,
started my dear friendship with The Patchsmith.
Look how far we've come together, since then!

{Hard to believe that The Patchsmith had never even heard of mug rugs, 
before the Zakka Style Sew Along!}


Who knows what magic will appear in your mailbox,
when you join a swap?
Any day now, I'll find out who made something berry special,
just for ME!  


Pin It

October 3, 2013

Craftsy Blogger Awards - Nominations through October 14th!

Nominate me for Craftsy's blogger awards!

Did I shock you?
Is that too brazen, to ask to be nominated
for a Craftsy blogger award?

{Giggle...it can't hurt!}

Craftsy Blogger Awards -
Nominate me and all your friends to win!

Click here to read all about it.
You can nominate your favorite bloggers
in 8 different categories,
now through October 14th.

Sewing
Quilting
Knitting & Crochet
Cake Decorating
Photography
Embroidery
Fine Art
Food & Cooking


Within each one of those categories,
there will be awards for each of 3 specialties:

Best Tutorials
Best Photography
Best Craftsy Instructor’s Blog


I can already think of some great bloggers 
I would like to recognize.
Once the nominations are tallied,
I'm hoping to find some great
new-to-me bloggers, too!

Don't forget to read all the details here,
and good luck to everyone...voters and bloggers, alike!


Pin It

October 1, 2013

October Across The Pond Sew Along - Skinny Pincushions!

Have you seen 'em?
Skinny pincushions are popping up
all over the place in blogland!
That's why Susie has chosen
this project as the October theme

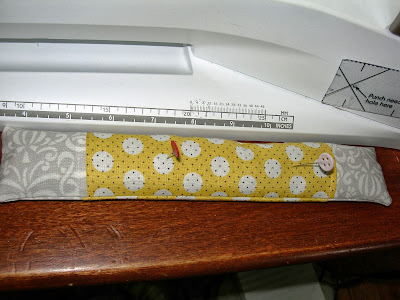
Here is Susie's sweet and skinny sample, sitting
snugly beside her stylish sewing machine, in the sunny studio.

{It's soooo Susie.}


Photo from Susie's Sunroom blog
Here's one made by Anna of Noodlehead.
You know it's a great idea,
when Anna's made one.

Photo from Noodlehead blog
I might have to copy Anna's design,
since I've got some beautiful Liberty scraps
left over from my own Liberty Pillow Challenge!

Next I'd like to show you
one made by Leigh Laurel Studios,
that's filled with reptile litter.
If you prefer, you can say the filling is
made from crushed walnuts.

{I don't do reptiles.}


Photo from Leigh Laurel Studios blog
Susie herself is a big fan of this stuffing for pincushions,
but in the form of kitty litter,
because it keeps pins sharpened when you use it!
It also adds weight to the pincushion,
so it won't roll away.
You'll wonder how something so skinny can weigh so much!


Photo from Susie's Sunroom blog
Let's see another skinny little thing,
nicely done by blueSusan Makes.
Head over to her post, and
she'll convince you that you need one, too!

{I love her blue sewing chair, don't you?}

Photo from blueSusan Makes blog
One more source of inspiration,
and then we're off to make our own!
There's a great description of the process
and even a source for emery powder

{That's a more traditional filling for pincushions. No reptiles ever involved.}

Photo from stitchpicky's blog...making two at a time!
There's a sweet tutorial out there,
showing exactly how to make
the Skinny Pincushion
for yourself.

I can't get the image to load,
but you can download the pattern from
by clicking the link provided on their blog.

Why didn't I ever think of such a cute and practical
sewing accessory?
I can really use this, keeping it
right in front of me as I sew little projects.

Join our Flickr pool when you make yours,
and stop back later this month to see my version!

{My mom gave me an idea for a real cutie, and I've got to try it!}


Pin It