February 28, 2013

Mini Christmas Stockings

There goes February!
The way time is flying in 2013,
I'm especially glad I've committed to making
at least one Christmas-y project
every month, along with Julie at The Crafty Quilter.

{Ahem...yesterday was the next-to-the-last day of the month, but that counts!}

g


There's another benefit to this promise I've made myself.
I've had this pattern for Mini Stockings by Fig Tree Quilts
almost since the moment it was released in fall of 2011.
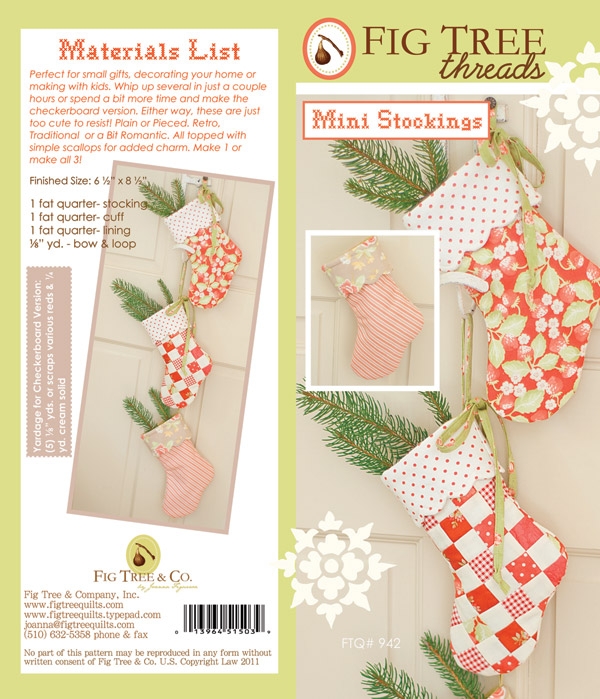
Photo from Fig Tree Quilts website
I've read it over and over,
because I enjoy pattern reading...
don't judge...but I've never actually made any stockings before now.

All of a sudden I now have 3 of them finished...so far!


I have amassed a pretty good stash of Cherry Christmas
fabrics by Aneela Hoey for Moda.
I pulled out my beloved fat-eighth bundle and some yardage.

The pattern calls for fat quarters of fabric for the little stockings.
I'm happy to report that fat eighths can be used instead,
with the important exception of the directional prints
in the body of the stocking.

{Save the directional prints for the cuff, if you don't have yardage.}


I'd like to show you what I made, review the pattern,
and point out a couple of tips I came up with in the process.

This was the first one I created...
I think the shaping of this stocking is absolutely perfect!

{I've checked out dozens of stockings, and this is "the one" for me!
It's just right, with respect to proportions and angle of the foot...
oh, yes, I care!  And it's small and CUTE.}


I plan to make some more of these cuties,
using the patchwork pieced method described in the pattern.
Being that it was the end of the month, though,
using single fabrics for the stocking pieces
made this a really quick and easy project.

{I'm saving the little scraps to stitch together into some patchwork...good idea, right?}

This pattern uses my BFF PFF...
that is, Pellon Fusible Fleece 987F.
I couldn't find any reference in the pattern
instructing which layer of fabric to line with the fleece.
I assumed it was the outer print, not the lining,
and it worked beautifully that way.
I just went ahead and fused the outer pieces as soon as I cut them.


After I made the first one,
I increased the cutting dimension for the height of the rectangles 
that are cut to make the scalloped cuff, by about 3/4"
to allow more room for the seam allowances, 
and to make the cuff just a wee bit larger.


{You can see the slight difference it made here.}


The method for sewing the scalloped edges
was the most exciting and innovative step of this project
for me, and I was thrilled with the outcome!


After sewing the seams for this project,
I trimmed each of them to about 1/8".
This allowed me to achieve nice smooth curves,
not only in the body of the stocking,
but also the tiny scalloped cuff edging.


Additionally, when I stitched the linings,
I purposely used a generous 1/4" seam,
so they would nest inside the stocking neatly.

I used a ton of steam to really flatten the finished stockings.


I left my stockings plain...for now...
and did not make the tie and loop for hanging them.  
I want some flexibility on how to use them.
They would be so pretty on a place setting,
for instance.

Closer to Christmas I will most likely
find a way to jazz them up a bit,
maybe with a little garnish of buttons or wool felt holly leaves.
For now I just love looking at them all fresh and smooth.

{Oh, and there's my little label inside the darling finished stockings.}


I can't say enough about how much I adore this pattern.
I was afraid I wouldn't be able to make them 
as pretty as the ones on the pattern cover, 
but I am so pleased with the results.

I think they are just delightful,
and I can't wait to plump them up
by filling them with little goodies this Christmas!


Pin It

February 27, 2013

Czech it out!

There's a theme that keeps coming up in my blog,
involving sew alongs and how they open up new doors.


For me, sew alongs start out
being personal, focusing only on myself.
I want to learn something new, and show it to others.

Pretty soon, I turn my thoughts away from myself
and start to get excited about what someone else
has done with "my" project.

Before I know it,
I'm emailing a new friend and offering
my unsolicited impressions about their awesome results.

That's how I found Vexa of Halabala Style
and many other dear friends during the Zakka Style Sew Along.
Vexa has taken the zakka House Pouch all around the world,
adding her own signature style to each one she creates.

{Here are just a few houses from Vexa's lovely neighborhood!}

Photo from Halabala Style blog

Vexa lives in Czechoslovakia,
and she sent me this AWESOME zakka House Pouch,
just because I loved it beyond belief!

{Thank you, Vexa - you are an angel!}


I'm just going to show you around my new little house,
pointing out a few of the exquisite details.

Come on in through the adorable front door, 
complete with a wreath that jingles and a button doorknob.  

{Aren't the windows cute, trimmed in red?}


Inside the pouch live these magical little gnomes!


The back of the house
is just as pretty as the front!
I love the fabric placements throughout.

{My little old red snowflake mug looks sooooo good with this pouch.}


This tiny reindeer is so graceful and sweet,
prancing on the organza snow!


You know me and my love affair with ric rac!


The detail and workmanship are exquisite.
I really really love this zipper pull a whole bunch!

{It's really a Christmas pouch, but it turned out to be perfect for February, too!}


Vexa confided to me...and now I'm blabbing it to you...
that she was a bit nervous about this house.
Can you believe it?

It is my newest treasure,
made very special by the fact that it came from a faraway friend,
who is as talented as she is generous.

I must collect some colorful scraps now to send to Czechoslovakia.
I'll be back soon with my Christmas in February projects!

{Here's the teaser peek...I'll be back soon with more!}


Pin It

February 17, 2013

Janet Made These!

The name of this blog is
"Amy Made That!...by eamylove"
but today I'm going to share some cuties
made by my work friend, Janet!

{Janet Made These!}


I've already shared photos of my first little
snow buddy, with my upcycled Snowflake Pillows.


Janet learned to make these
from a Pinterest-popular tutorial,
and if I'm not mistaken,
it's this one by Amy of "Then She Made".

{This is getting so confusing!}


Originals by Then She Made
I needed a couple of sweet presents
for my mom and my sister,
so I went shopping for some Valentine socks
at the local dollar store,
and asked Janet to whip up two more snowmen for me.

Look at Janet's magic...


The three of them spent some time together
posing for me.


Now they are all settled in their new homes...
at my sister's...


and my mom's house.


They were born
just in time for a few new snow flurries
in the neighborhood.

Happy Snowy Days!


Pin It

February 13, 2013

Be My Valentine

Happy Valentine's Day, everyone!
How would you like to stitch up your own version of my
BE MY VALENTINE mug rug?
Etsy in my shop, called eamylove.
It's written in a tutorial style, with loads of step-by-step photos and tips!


I've had fun this month creating hearts
in anticipation of this lovely holiday,
and today I have a few more to share with you.

I love that ricrac
and all those little squares of pink and red and white.

I didn't have to go far to find some scraps
from my table runner and pillow
that were perfect for these mug rugs!

The trimmed pieces from the Herringbone Blocks
and leftover strips gave me a jumpstart,
 using these fabulous fabrics.


I'm not gonna lie...it took me a long while
to create a piece of patchwork made up of 
tiny little squares.

Then I did some cross-hatching
and cut a pretty heart shape from the quilted magic
that came from my sewing machine.

Here's where I veered away from the original...
I put my ricrac between the layers, to finish the edge.

{Love at first sight!}


Want to see the back?


So sweet...and fun to make, actually.
I just had to make another one.

Instead of all the little squares,
I pieced a large patchwork from those 
herringbone block trimmings,
then cut my heart shape.

This time I did some stipple quilting.


I had enough left for a third mug rug, too,
quilted in square cross-hatching again.

I like the way it looks like a crazy quilt.


Here are the backs of the whole set.


They look so pretty all together.


Each one is cute on its own, too!


I have such a great sense of accomplishment,
creating a few of these things that have
been in my mental Pinterest file
since before Pinterest came along!


I hope you'll enjoy
a very special St. Valentine's Day
with someone you love!


If you would like to make your own "Be My Valentine" mug rugs,
the pattern is available here on Craftsy, for only $2.99.
I'd love to see what you create!


Pin It

February 9, 2013

Love of Learning

Let's take a few minutes to enjoy a cup of tea
or coffee or cocoa
while we talk stitching!


Next month will mark a year since I began
my blog, but I've been sewing and quilting
much longer than one year.

On my blog I have opportunities to share
some things I've sewn recently,
and I like to fold in some "extras" now and then,
featuring projects that were made several years ago!

Today I'm showing a small wall hanging
I made when I took a class from Sue Nickels way back in 2007.
The course lasted two or three days, with the first day or two being spent
learning machine applique from the queen of applique herself.


I would describe Sue's signature style
as bright and energized, featuring saturated tones.
Check out the Beatles Quilt made by Sue and her sister Pat Holly,
and you will see what I mean.


For my class project, I used mostly soft pinks and greens,
pulling prints from my beloved 3 Sisters fabrics
including "Paris Flea Market" - the original release - and "Gingham Rose".

{I was really stretching my boundaries with the darker rose color!}

There were tonal prints, tiny florals, some paisley and even a woven plaid.
The ivory background is hard to see here, but it was a text print,
with subtle cursive writing in a pale tan.


When we learned to quilt the feathers, I was in heaven.  
I still enjoy making that design the most whenever I am machine quilting.

I remember so much of what I learned in the class,
and Sue is one of the best teachers I've ever met...
smart, vibrant, friendly and supportive.

{I bonded with her as soon as she took her shoe off for sewing!}


I chose to use invisible thread
for quilting, so that the texture mimics that of
hand-quilting, without interrupting the fabric design.


This is one of my most loved little quilts I've ever made.
It isn't exactly modern or trendy, but I love it dearly.
I would like to report that my husband chose
a place where my little quilt can be prominently displayed
all year round in our little house...but...not so much.

He lets me bring it out for Valentine's Day, though.
<3


It's such a funny thing...
just the other day I was reading Julie's blog, The Crafty Quilter
and she is beginning a new series about Applique.
She showed the Sue Nickels teaching project 
on her site, and I recognized it instantly.

I'll be checking out Julie's posts
to see what else I can learn in the world of applique!


Thanks for stopping by...come back soon!


Pin It