So far, so good...
I'm making at least one Christmas-y project
per month in 2013,
and here's my finish for March.


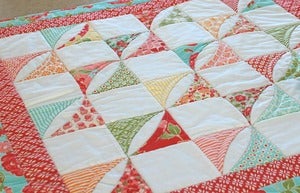
I've been dying to try out this pattern from Cotton Way,
called Cotton Way Candy.
{I purchased the PDF version, and I can follow it on my tablet as I sew...
no more wondering where I might have stuck that paper pattern!}
 |
| Pattern for Cotton Way Candy - from Cotton Way website |
I had so much fun placing the folded squares from my
Cherry Christmas charm pack!
{I used dozens of pins, to hold the folded triangles in place for stitching.}

When they were all stitched into a checkerboard pattern,
I added only one narrow border.
It's for my kitchen table, and I didn't want it to be too large.

Can I let you in on a secret tip?
I used a 100% cotton batting,
I used a 100% cotton batting,
and once I smoothed down my quilt sandwich,
the fabrics gripped the batting so well
that I didn't even use one single pin to hold it
while I stitched some stabilizing lines
along the border and basted the edge!
{Gasp! I'll wait while somebody gets you some smelling salts.}
If you are a "Pinner", I have a nice resource for you to find dozens of pins!
The next step was to do some quilting...
nothing too fancy, just diagonal lines across the white squares.

Whenever I want to keep my lines super-straight,
I use masking tape as a guide.
That way I don't have to worry about marking lines
that refuse to come out later!

I turned the quilt and stitched more lines
in the opposite direction, to make x's.
Here's where I made a slight departure from the pattern!
The blocks looked too large to me
for folding over the edges a la Cathedral Windows.
I didn't want those windows to be opened very far.
I didn't want those windows to be opened very far.

I decided it would be perfect,
if I stitched another set of diagonal lines
across the folds,
in effect reducing the size of the "windows" by half.

Then I went ahead and created the Cathedral Windows,
folding and stitching each of them by machine.
{It was so easy...I didn't even use any pins...again!}


I love the back, too...nothin' but fresh clean white.

{It's just for show...clearly I must explain that to my family...clearly!}

I can always remember that I made this
Cathedral Windows project
Cathedral Windows project
while Pope Francis was being elected!

There was even some snow available for my little photo shoot!

Come along with the Crafty Quilter and me...
and we'll make Christmas happen every month!


Stop in again soon...I've still got lots of Cherry Christmas fabric left!


Pin It
Gorgeous! I. Love the narrower windows! And really? All or nothing for the pins. It worked just fine! .....
ReplyDeleteYou beat me to Christmas this month! I just love the quilt and it looks like a nice introduction to cathedral windows. Thanks for all of the details, Amy. I have no excuses now!
ReplyDeleteVery cute and I like the smaller windows too.
ReplyDeleteGreat tip on using masking tape..... I am going to be starting my first quilting attempt soon and this is exactly what I needed to help get it jump started.... Thank you sooooo much!
ReplyDeleteGreat job! Love the quilt! FYI...when I use this method of folding my fabric back I use Roxanne's Baste-It Fabric Glue. I glue, fold back and use 3 pins until dry then remove pins and sew. The glue drives quickly and no removing pins as I sew because I remove them prior to sewing. By the time I finish gluing the last piece the first one is dry. Works like a charm. Have a great weekend!
ReplyDeleteBeautiful work, Amy! I'm impressed you didn't use pins! I love it when that happens. And thanks for the tip on the tape as a guide. I will try that next time!
ReplyDeleteAmy I just love it ! I am working on my first cathedral windows project ... It's so much fun ! Have a great weekend !
ReplyDeleteIt's a lovely little (what size is it?) quilt! Actually quite fresh and spring-like... And I like what you've done, halving the windows.
ReplyDeleteVery cute! I love your tip of using masking tape for straight lines. I had never thought of that.
ReplyDeleteI saw this on Flickr and loved it. I love it even more now after reading your post about it! It's just great!
ReplyDelete