August 19, 2013

Nautical Pillows for the Deck

As summer draws to a close,
time spent on our back deck becomes more cherished.
That's why I jumped at the opportunity
to stitch up some fabulous nautical pillows,
using these awesome prints from Terry's Fabrics!


has a vast selection of fabrics,
so it wasn't easy to choose between them.
 I had THE BEACH on my mind, so
my search for a focus fabric ended as soon as I discovered
this awesome nautical beach hut print.


I mixed in some fun coordinates:
an ocean blue geometric floral,
some sandy gingham, and fun beach-ball dots.

When I saw the fabrics in person,
I was delighted with the way my choices coordinated!
The prints were actually much larger than I had pictured them...
especially the dots...but that was a GREAT thing!


The quality is superior, and the fabrics were
highly cooperative, with no stiffness or tendency to fray.
All of my prints were home dec weight, except the gingham,
which was a lighter weight, more like quilter's cotton,
but woven...not printed.


I chose to use the gingham for my pillow backings,
and it worked perfectly, since I like to add a layer of
Pellon ShapeFlex SF 101 fusible interfacing anyway.


I kept the pillow top designs simple,
letting the fabrics play together in similar, 
but different strip sets, for the two pillows.


I stuffed my pillow forms inside,
and they were all set for picnics on the deck.

{I love the way the covers take up almost no space at all for winter storage,
and I can use the pillow forms for other covers.}


Beach huts, umbrellas, and bunting...
checks, stripes and dots...
just about all of my favorites are represented!


Terry's Fabrics is my favorite new find of the summer,
helping me to decorate my outdoor space.


Hmm...wouldn't the scraps make
the cutest beach tote???


Pin It

August 16, 2013

Gingham Love

I love gingham.
You probably knew that already if you've
been visiting my blog often.

Here's where my love of gingham all began...


Truthfully it began even before this...
I'm pretty sure I made myself a prom gown
from this same blue gingham in the late 70s.

{Stop snickering...you know you wore some crazy get-ups in the 70s, too!  
Or at least your mother did.  Or your grandmother.}

Anyway...
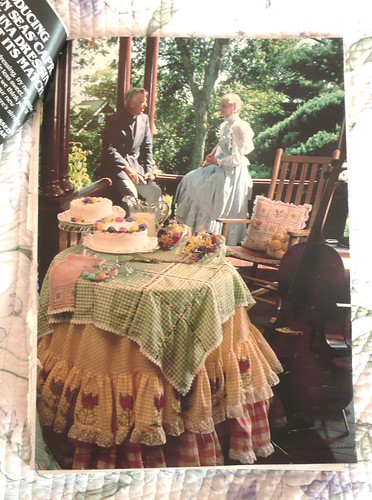
my sister has the full story of these gingham pillows
we made a loooooong time ago,
over at Susie's Sunroom.

We were inspired by this pattern published
in the June 1979 Better Homes & Gardens magazine.
Embroidering on gingham is called "chicken-scratch".

{See that pillow on the rocker?}

Photo from Susie Z. on Flickr
In all, Susie and I stitched up three of those pillows,
in blue, purple and green.
Susie came across two of them,
and our mom has the third.

These were a great way for two {young} sisters to spend
one of the last leisurely summers of our young lives.


I've got to admit that this is really out of style,
and the stuffing is all lumpy.


The floss colors are also dated,
but if I recall, there were probably only about
20 shades of embroidery floss available back then!

{Dark blue, light blue, dark yellow, light yellow, dark green, light green...}


A few of the stitches have worked loose,
and the lace is kinda faded,
but it's still a pretty reminder of good times.


This early influence still shows up now and then
in my latest projects...


I especially still love gingham in the kitchen.


I'll bet that's why I chose gingham for the background
in my Winter Dresden quilt, too.


Head on over to Susie's Sunroom today for the full story
of our gingham days!
I think I may be inspired to try a little chicken-scratch
this summer!


Pin It

August 10, 2013

Daisy Pinwheel Block

It appears that I'm not the only one
who really loves Pinwheels,
our August theme for 
the Across The Pond Sew Along!


Besides Susie and Amanda,
who have already been making their Pinwheel projects,
there's a whole new fun series going on
over at Summercrafter,

{Elaine's first featured block is actually the Pinwheel.}


Well, it's not Friday night any more,
but I'm going to join the party, fashionably late.

One of the Pinwheels I highlighted in my pinwheel theme
post was called Daisy Pinwheel,
I decided to make this block and try my hand
at a bit of curved piecing.

I'm happy to report that it was actually
very easy to make this pretty pinwheel!

Keeping the vintage vibe,
I chose some of my 30's repro scraps
in reds, whites and blues.


I just followed Charise's directions to create the pinwheel.

{I think the pattern was missing one of the notches, but I just folded my pattern in half and marked the notch there.}


I chose to use freezer paper for my templates.
I traced the pattern onto the paper side of the freezer paper,
then cut them out on the drawn lines.
Seam allowances were already included.

I have to admit that I chose to iron my freezer paper
templates onto the WRONG side of the fabrics.
This worked fine, but if you want your pinwheel
to spin in the same direction as Charise's,
just iron all of the templates to the RIGHT sides of the fabric.

I almost called it "finished"
when I saw that the center points all
came together fairly nicely.


Then I decided to make one little yoyo for the center,
using another cute repro print...


and stitch it into place, along with a button.


That's better...now it's done!


Have fun making your own pinwheels,
and link up at Summercrafter
and the Across The Pond Sew Along on Flickr!

{I know I'm not finished yet making Pinwheels!}


Pin It

August 6, 2013

Days at the Beach

We just got back from our vacation in Ocean City, MD.
Not only did we bring home lots of Dolle's Salt Water Taffy,
but I also managed to bring back some quilty sweets!


Packing for vacation was a bit nerve-wracking,
especially when I realized that there would be
no room in the schedule...or the motel room...
for a sewing machine.


What's a girl to do about that?
A little advanced planning did wonders.

My sister Susie gifted me with a charm pack of Lario
by 3 Sisters for Moda.
I decided to use it to make a whole bunch of yoyos.


I used a small saucer to make my circle template,
measuring about  4" in diameter.
I traced the template circles
onto the wrong sides of the charm squares,
cutting out 4 or 5 at a time.

{The finished yoyos are 2" across.}

I packed my sweet little Cath Kidston-ish sewing kit 
that I found at a local thrift shop a few months ago!


Yep...I paid 99 cents for this little gem!
Here's what's inside...


 I added more thread, needles and scissors,
and my little yoyo kit was all set for the beach.

The background is an old vintage quilt
that we always use as a beach blanket.


I stuck my toes in the sand
and stitched to the music of the ocean waves and seagulls...


Stay tuned for the finished project.


Even I have no idea yet how it will look...
but I love it already.


Pin It

August 1, 2013

Pinwheels for August - Across the Pond Sew Along

It's been a nice hot summer where I live,
and I've been thinking a lot about cool breezes,
vintage fans, and fresh air.

That's how I came up with the August theme for the 
Across the Pond Sew Along...


We're going to be making Pinwheels!

Here are some ideas for inspiration.
Anything can be a pinwheel...
there are pinwheel cookies...

Pinwheel Cookies by CookEatDelicious

Wreath by Simply Sweet Home blog
and of course, all kinds of Pinwheel quilt blocks!

Here is a sampling of the awesome pinwheel quilts
I came across, looking for my own inspiration.

There are some great 3D Pinwheel patterns out there!

{Our friend Vexa from Negligent Style has a flair for 3D, and she's going to love these!}

This one is from The Pattern Basket,
and I love the way the white pinwheels contrast with
the colorful backgrounds.


If you want a great free tutorial,

Photo credit:  by Anjeanette
Also, I couldn't believe the perfect timing for this
charming table runner,
made by Angela of Knitty Bitties, from another free tutorial.

{Sadly, I couldn't get the link to work for the tutorial, but you could use one of the others I found to make the 3D blocks.}

Photo Credit:  Knitty Bitties blog
You'll find some more simple, but clever,
pinwheel block tutorials over at Pleasant Home.

Jodi must have a "thing" for pinwheels, too,
because she's got a bazillion sweet projects,

Photo by Pleasant Home - Christmas Pinwheel  Runner
available in the Pleasant Home shop on Etsy.
I've got one, and I used it when I made my
vintage kitchen table runner, shown here.


There are soooo many more great pinwheel
blocks out there!
This one caught my eye...I hope to make my own version
of this incredibly sweet vintage design from Charise Creates.

It's called Daisy Pinwheel, and
there is curved piecing involved, but it looks well worth the effort.

Photo from Charise Creates blog

If that looks too complicated,
you can always get back to basics with a few
squares and half-square triangles.
Use this diagram from Free Quilt Block Patterns,
and create countless variations.

{Time to sharpen our colored pencils!}


Let's have a fun time this month,
creating a bunch of pretty pinwheels!

Don't forget to show off your finishes


Pin It