Showing posts with label zakka style. Show all posts

February 27, 2013

Czech it out!

There's a theme that keeps coming up in my blog,
involving sew alongs and how they open up new doors.


For me, sew alongs start out
being personal, focusing only on myself.
I want to learn something new, and show it to others.

Pretty soon, I turn my thoughts away from myself
and start to get excited about what someone else
has done with "my" project.

Before I know it,
I'm emailing a new friend and offering
my unsolicited impressions about their awesome results.

That's how I found Vexa of Halabala Style
and many other dear friends during the Zakka Style Sew Along.
Vexa has taken the zakka House Pouch all around the world,
adding her own signature style to each one she creates.

{Here are just a few houses from Vexa's lovely neighborhood!}

Photo from Halabala Style blog

Vexa lives in Czechoslovakia,
and she sent me this AWESOME zakka House Pouch,
just because I loved it beyond belief!

{Thank you, Vexa - you are an angel!}


I'm just going to show you around my new little house,
pointing out a few of the exquisite details.

Come on in through the adorable front door, 
complete with a wreath that jingles and a button doorknob.  

{Aren't the windows cute, trimmed in red?}


Inside the pouch live these magical little gnomes!


The back of the house
is just as pretty as the front!
I love the fabric placements throughout.

{My little old red snowflake mug looks sooooo good with this pouch.}


This tiny reindeer is so graceful and sweet,
prancing on the organza snow!


You know me and my love affair with ric rac!


The detail and workmanship are exquisite.
I really really love this zipper pull a whole bunch!

{It's really a Christmas pouch, but it turned out to be perfect for February, too!}


Vexa confided to me...and now I'm blabbing it to you...
that she was a bit nervous about this house.
Can you believe it?

It is my newest treasure,
made very special by the fact that it came from a faraway friend,
who is as talented as she is generous.

I must collect some colorful scraps now to send to Czechoslovakia.
I'll be back soon with my Christmas in February projects!

{Here's the teaser peek...I'll be back soon with more!}


Pin It

September 15, 2012

Farewell to the Zakka Sew Along

Hello!
If you've been reading my blog for any length of time, 
you've already seen just how much fun I've been having 

{A big thank-you goes to Amy and Lindsey for making this event
an outstanding success!}


I've been reflecting on this event, and I must admit that
I'll be relieved not to have a due-date each week
for a project that I've never made before in my life!

Having said that, though, I made several projects NOW, rather than SOMEDAY,
or NEVER...because of the deadlines and the wonderful prize opportunities!

{I almost skipped this week's project...there are other things I should be doing.}

But I gave myself a little pep talk last night and convinced myself
to get started on this week's project...Nesting Boxes.

This project was contributed by

{I've been aware of Laurraine's lovely work for a while via Flickr...
Look at this fantastic classic example of her style!}

Photo from Patchwork Pottery blog
This final project has been a tempting one for me...
I knew I would want to keep the boxes for my own use, so I chose some fabrics that would coordinate with one of my favorite quilts.

{The quilt pattern is Bird Song by Fig Tree Quilts.}

.

It took some time to cut all of the pieces out,
but it was good to see my favorite prints from Dandelion Girl again!

{I had used a fat quarter bundle to make my quilt, and there were
some nice scraps left.}


I really enjoyed stitching the leaves, though I chose to use fusible web
instead of using the method described in the book.

{Can you see the pretty veins on the leaves?}


I was running out of linen, but I had a nice big piece of Mill House Inn,
also by Fig Tree Quilts, that I liked for the lining.


There were some moments I wished I had not tackled all three boxes!
Yet I love the way they came out. 
They really make me think of September days.


I keep thinking there must be a better way to sew the sides and bottom
together.  I was such a rebel...I actually just stitched mine together by machine, and it's not very neat, but it doesn't really show.

{I never did come up with that "better way" to do it!}


I have no idea what I'm going to put in these little boxes,
but I know they're going to make the stuff look extra pretty!

{That's the best part about zakka style.}


I joined this adventure when my own blog was brand-new,
and I feel that I owe much of the joy of blogging
to this sew along!


I've met so many wonderful people through the linkies and the Flickr group.
We are spreading zakka throughout the world,
making things that are useful AND beautiful!

Visit the Flickr group Zakka Style Sew Along
for more inspiration!


Pin It

September 7, 2012

Zakka Style Week #23 - Message Board

Here we are at the next-to-the-last project
in the Zakka Style Sew Along!

{This fun event has been hosted by Lindsey at LRStitched.}


This week's project was one I've been looking forward to making,
ever since the first time I thumbed through the Zakka Style book...

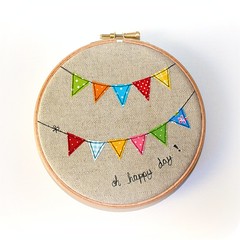
It's delightful, and it's called the Happy Garland Message Board!

The contributor is Katrien Van Deuren of the blog

I've been aware of Katrien's work for a while now.
I favorited some of her Flickr photos a long time ago,
which featured bright bits of applique on a linen background,
framed in a hoop, like the one shown below.

And now she's shown us how to make our own versions in the book!

The hardest part about this project was gathering all the sweet little accessories that were necessary to make it so adorable.

Luckily I found a spool of green and white twine
and lots of teeny tiny clothespins one day at my local craft store!


I rummaged around and came up with 
an embroidery hoop in the right size, too!

I decided to use Heat N Bond to fuse my little flags in place,
then stitch them all together into two swags.


I was done stitching in no time!


My little hoop will be used to hold fabric swatches,
inspiring me to make projects from certain lines or colors.


I can't WAIT to dig into my layer cake of Simply Color


Pin It

July 19, 2012

Zakka Style Week #16 - PatchworkRibbon

Welcome to another chapter in the
Zakka Style Sew Along!

{If you are new to the sew along,
you can find out more at LRStitched.}


This week's project is contributed by
who designed the Ruby Star lines for Kokka.

{I have one precious piece of Ruby Star Rising, which I fussy-cut in this mug rug.}


I've spent a lot of time with the Zakka Style book,
in preparation for each of the many projects
I've created.

I've observed that there is a greater chance
of success and fun when I wait
for some of my sewing sisters,
to blaze the trail for me,
warning of the pitfalls that one could encounter.

{Personally, I think Amanda's ribbon turned out very pretty...
even if it requires its own vacuum cleaner.}


Admittedly there were some raggedy issues...
but I really wanted to make this patchwork ribbon!

Pretty soon, Lindsay reported a few innovative quilters who
found some alternate techniques to get around the 
raw edge problems.

used pieced strips cut on the bias, and then stitched 
the long edges together,
minimizing the loose thread problems.

{Looking great, Linda!}


OK...I told myself, "I've got this!"

I found some long strips of Aster Manor prints
in rich,warm red and brown tones.

I decided not to leave my edges unfinished...
first I pieced my 2 1/4" strips together,
on the bias, as I would piece binding.
I connected both ends, creating a tube.

Then I folded the tube in half, right sides together,
and stitched along one of the long edges.
I opened it up and pressed under the 
remaining raw edges, with right sides out.

I stitched near the edges, the whole way around my ribbon.

{I am not a fan of turning tubes right side out!}


It was pretty, alright... pretty boring!
I felt that it needed a little something,
but I didn't have any vintage scraps of lace or ribbon handy.

In Lindsay's latest update on the project, she referred
the faint of heart not only to Linda's example,
but also to Simone's finished ribbon.

{Go and see!  Simone details her process for making this sweet version!}


I was consumed with affection for the stamped words
on this beautiful bit of inspiration.

It reminded me of the Zakka Pincushion project from Week #3.
I really liked the way Debbie from A Quilter's Table
used a stamp to make a darling little spool of thread
on a linen scrap, for her pincushion, pictured below.

{I didn't have the stuff to stamp fabric with then, and I still don't have it now.}


Somehow or another, I wound up working out a fun little swap
with Debbie, and she actually sent me her little stamped ribbons!

{Here is Debbie's photo of the little linen ribbons.  Can you blame me for wanting them?}


And that's when I had my Aha! moment.
I would use those little stamped spools and houses to decorate
my finished patchwork ribbon!

I used some Heat N Bond to cut out little squares from the stamped tape,
and also a few motifs from my panel by Susan Branch,
shown here.


Here's what happened...


And also...


Pretty soon, I fell in love with my own version!


I used a couple of scraps from my Winter Dresden quilt, too!

{Hopefully I'll be sharing a new post about the finished quilt before long.}


It finally felt "finished" now!


Whoever gets this ribbon on her package this Christmas 
will have to sign a contract,
stating that she will not ever throw it away!

;)
Pin It

July 6, 2012

Zakka Water Bottle Holder

Welcome back to the Zakka Style Sew Along, hosted by


This week's project, the Water Bottle Holder, was contributed by

{You must go and visit her...her bags and other projects are wonderful!}


I'm not gonna lie...I was not really panning to make this project.
I figured at some point I would have to
take a break from the quick pace of
one project each week...

{Who knew I would be missing 5 projects before this one?}

But here in Southwestern Pennsylvania,
it's been a long hot summer already!
Temperatures have been
in the 90's and holding.


Motivated by the heat wave, I've already finished my
Zakka Water Bottle Holder!


{Ta-dah!!!}


Let's get started with the fabrics I used...

I wanted this water bottle for my own use,
so I picked some Strawberry Fields {top}
and Buttercup {bottom} prints,
both by Fig Tree Quilts for Moda.

{The European linen I have in Cream
looks just right with the prints!}


I got started stitching, after I read the Flickr group thread,
which warned of a few pitfalls with this project.

I decided to follow the book loosely,
but make the water bottle holder "my way"
using techniques I use when I make my purses.

One thing I did was make the printed outer piece into a divided pocket,
rather than stitch it down all the way across the linen.

I also used Pellon 987F fusible fleece
for the lining, the outer piece, and the pocket.


{I'ts not a big pocket, but I could put some $ in there!}


Also, for the appliqued rectangle,
I made mine kind of big, to show off the pretty contrasting
lining, since it doesn't show up much when in use.

{I used Heat N Bond, and stitched it with a cute zigzag, which made me happy!}


After sewing the "tube" it was time for stitching the "circle"
in place for the bottom of the holder.
This was rather new to me, since I don't make circular purses.
If I had it to do again, I would mark the seam line on the tube
and also on the circle, to match everything up perfectly.

{Here is where I'm going to show you my feet of clay.
It's not very round.  Hmmm...but it worked anyway.}


For the strap, I used both prints,
and I didn't use a turning technique.
Instead, I stitched the two long sides together,
then ironed 1/4" under on each of the other two long edges.

{I stitched near both edges and had this pretty strap when I was done.
I just inserted the strap ends between the outer piece and the lining,
before sewing along the top edge.}


You know, I don't really like water.
But recently I was introduced to these fantastic
flavored concentrates, and I am crazy about them!

{Have you tried them?  Do you have a favorite?
Mine would be the Blueberry Lemonade.}


I think this little holder will be going lots of places with me this summer!


Pin It