Showing posts with label bunting. Show all posts

December 4, 2013

Handmade Holidays from All Year Long - 2013

I really really really love Christmas...
especially the handmade decorations
and cookies that go along with it.

Last December I finally acknowledged to myself
that the month of December
is probably the month when I actually sew the least!
No wonder, since I do my sewing in the dining room.

That's why I decided to try to make at least one
Christmas-y handmade / handsewn item
every month, during 2013.

Would you like to see a review of my year
of handmade holiday stitching?

a Snowflake pillow made from a vintage quilt.


Mini Christmas stockings from the Fig Tree Quilts pattern.


March...
a Cherry Christmas table runner from the Cotton Way Candy pattern.


April...
a Paper Snowflake Pillow from my own tutorial.


May...
a Divided Basket from the Noodlehead pattern.


June...
Some Christmas gift tags using a tutorial by Nana Company.


July...
First, a Topiary Tree Pillow from my own free tutorial...


August...
Christmas Pinwheel mug rugs.


a Christmas mug rug from The Patchsmith's Ticker Tape pattern.


the Comfort and Joy mug rug of my own design.


November...
was a big finish for me. The Holly Jolly Tree Skirt
really put me in the Christmas spirit.

{I need to make another one for myself!}


and now it's December!

{Will I actually make something this month?  Stay tuned...}
Pin It

July 13, 2013

JOY in July - A Christmas Bunting

It's beginning to look a lot like...
Christmas in July!


That's our chosen theme for the Across the Pond Sew Along...


and it's also the reason for a fun blog hop

{I've already posted my Christmas Tree Topiary Pillow for the blog hop here.}


has come up with not one, 
but TWO free bunting patterns for her July contributions!

Gingerbread Bunting by The Patchsmith
JOY Bunting by The Patchsmith
I decided to make the JOY bunting for our living room.
I used scraps from Glace, an older Christmas line
by 3 Sisters for Moda.

{I love the aqua, brown and red floral and holly prints.}


I love how quickly this project came together.
I'm pretty sure I had it all finished in less than an hour.

The fusible applique was very simple.
I just stitched along the edges of the applique pieces.


I didn't have the shade of ribbon I wanted,
so I just sewed the pennants to a long piece of aqua binding,
taco-style.

{I just tucked the pieces between the folds, pinned into place,
and stitched along one edge.  Easy!}


This decoration will be so easy to store until Christmastime.
Look at my little bundle of JOY!


If you want to, you could add more pennants,
to make it as long as you like.


Today I'm decking the deck with boughs of holly.


This winter I should take new photos,
with snow, instead of grass, in the background.


I hope you'll join us and stitch up something
for Christmas in July.
You can add your photos to the ATPSA Flickr group.

If your December is super busy, like most people I know,
you won't be sorry you've planned ahead!


Pin It

September 7, 2012

Zakka Style Week #23 - Message Board

Here we are at the next-to-the-last project
in the Zakka Style Sew Along!

{This fun event has been hosted by Lindsey at LRStitched.}


This week's project was one I've been looking forward to making,
ever since the first time I thumbed through the Zakka Style book...

It's delightful, and it's called the Happy Garland Message Board!

The contributor is Katrien Van Deuren of the blog

I've been aware of Katrien's work for a while now.
I favorited some of her Flickr photos a long time ago,
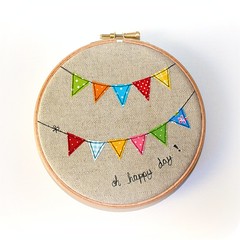
which featured bright bits of applique on a linen background,
framed in a hoop, like the one shown below.

And now she's shown us how to make our own versions in the book!

The hardest part about this project was gathering all the sweet little accessories that were necessary to make it so adorable.

Luckily I found a spool of green and white twine
and lots of teeny tiny clothespins one day at my local craft store!


I rummaged around and came up with 
an embroidery hoop in the right size, too!

I decided to use Heat N Bond to fuse my little flags in place,
then stitch them all together into two swags.


I was done stitching in no time!


My little hoop will be used to hold fabric swatches,
inspiring me to make projects from certain lines or colors.


I can't WAIT to dig into my layer cake of Simply Color


Pin It