June 2, 2013

My New Summer Cottage - June Across the Pond Sew Along

Welcome, friends,
to the June edition of the 


It's The Patchsmith's turn to choose the theme,
and she has selected a sweet House Ornament.

As of June 1, Amanda had already
constructed two adorable little cottages!
Pop on over to her post, to see her clever innovation 
for the red one shown below.

{You won't be sorry!}

Photo by Amanda The Patchsmith

The best part about this month's project is that
we can all make these adorable houses 

If you go to Flickr and search for "Retromama houses,"
you will come up with all sorts of inspiration.

Here is a super sweet one made by Kim - Retromama herself.
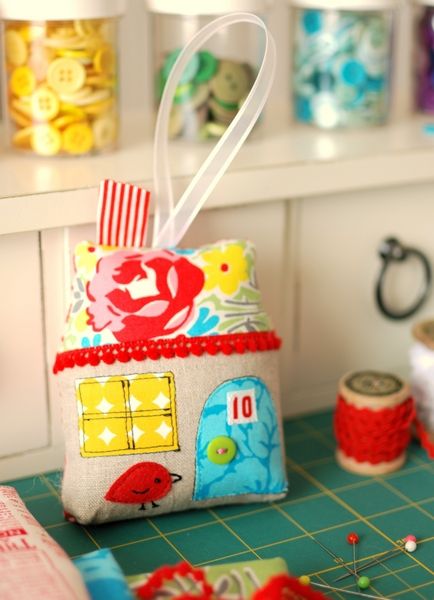
Photo from Kim of Retromama

I found this darling little Christmas house,
It's just one of many cuties she has made.

{Look at the Christmas tree in the window...heavenly!}
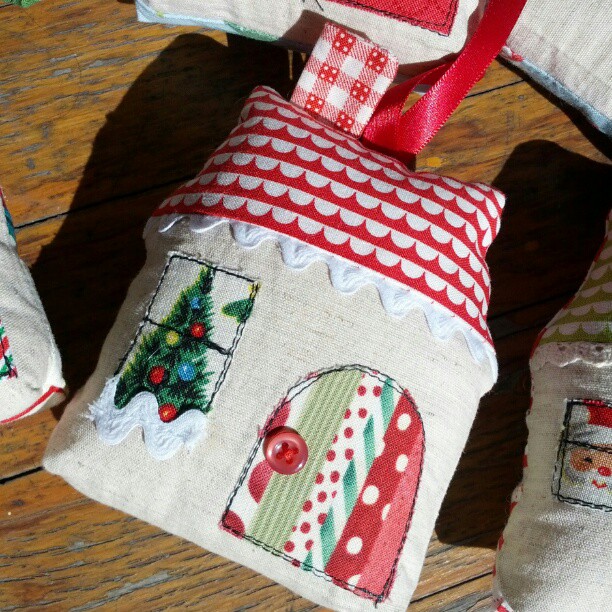
Photo by Kylie of Three Honeybees

The little houses are made as ornaments, with ribbons for hanging.
Take a look at what Josee of cul de sac blog has done with her houses,
decorating a beautiful curtain valance.
You must visit her post to see and believe 
the astonishing details on each little cottage!

{Utterly charming, right?}
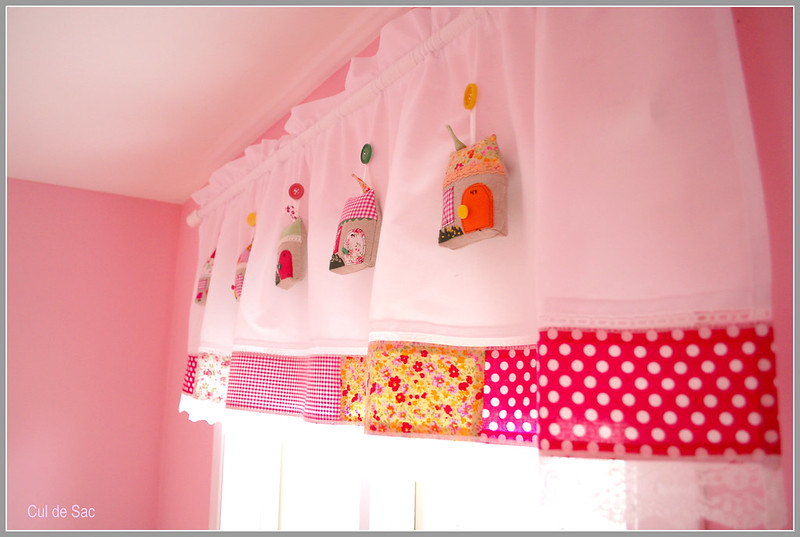
Photo by Josee of cul de sac blog
And now...there's a new building over at Susie's Sunroom,
and she's added all the charm of an English garden
to her sweet little cottage!

{I think I had an English accent when I read her post to myself.}

Photo from Susie's Sunroom
I must say that if I'd seen Susie's house first, my window
might have had a contrasting color of thread
for the stitching.  Brilliant touch!

I have to admit that I've had this house ornament
on my must-make list for quite a while.
I even had this issue of Make It Yourself 
magazine by BH&G since late 2012,
which featured the same pattern,
among dozens of other great projects.

{My pages are nearly all dog-eared.}


provides me with that little
kick in the pants that I need,
so that I actually make a few of those must-do things!

Using some scraps from a recent project,
I set to work building my own little house.


Here's the result, and I'm so pleased with it!


Why, oh why, did I wait so long to build my dream house?
I love every little detail.


It's just so tiny and sweet.
I made the house number from a bit of selvage,
and it happens to be the house number of someone
in my real life. ;)


I found myself missing a coordinating 
piece of ribbon for hanging.
I improvised with my pinking shears,
to make a fabric strip hanger.


The back of this house is plain,
but if I make any more, I might invest
some time into adding details on the reverse side.

{The Patchsmith's back yard puts mine to shame.}


I have to admit that
this house is really very small,
and it took me a while to turn it inside out
after stitching it together.
I think it was worth the effort, though.  I love it!

I'm so glad that I waited until the last step
to add the little button doorknob.


I have some great polyfil that resists clumping,
and it was just right for this tiny project.
I picked it up at my local Walmart
and would recommend it for stuffed softies
and really small projects like this one.


Wouldn't this house make an adorable pincushion???

{Or a little housewarming or hostess gift?}


We hope you'll be inspired to join us in our
little Sew Along and add your photos to our Flickr group.

{Past finishes or latecomers are always welcome, too.}

Next time I post,
I'll let you know what else I made with my little house fabrics.

{If you want to know where my scraps came from...come back soon!}


Pin It

May 24, 2013

Celebrate! A New Mug Rug Pattern

This weekend I've got something to celebrate...
I've launched my new PDF pattern
for a fun and fresh new mug rug,
called...Celebrate!


I've gotta tell you that I didn't really plan
for this to be my next pattern,
but I've had the idea in my mind for a long time.


It came to life when
I made a kitchen-themed basket
for my son's Relay for Life team to raffle,
and I made this little mug rug as part of the prize.


I began with a Divided Basket
in a turquoise and lime color scheme.


I added a bunch of fun turquoise and lime stuff, 
like napkins, a silicone trivet,
a candle, some straws, and some picnic plates.


Here's the back of the basket.


See that Denyse Schmidt print I picked up at my JoAnn store?
I featured it, adding a sweet lime polka dot
and a fabulous turquoise chevron from Riley Blake!


I filled it with some more handmade goodies...
and some pretty coasters.


I know you want to see more of those coasters, right?


I whipped them up using my own Moda Bake Shop tutorial.


I'm hoping the winner of the basket
will feel happy each time she uses it.
:)


When I made my little mug rug,
I took some photos and made some notes...
and now I've got the pattern ready for sale!


There's something for everyone here...
a bit of applique using fusible webbing...


And a wee bit of embroidery...


All tied together with some bright binding.


You can find the Celebrate Mug Rug pattern 

in honor of Memorial Day...
even more reason to celebrate!}


It's also available in my shop on Etsy,


Pin It

May 23, 2013

Postage Stamp Basket Blocks

I have a "thing" for baskets...
and another "thing" for pincushions.

Here's one way I took care of both of those "things."


The May theme for the Across The Pond Sew Along
is BASKETS, and I must confess I had a head-start making mine.
Look at this stack of blocks that I made
a long time ago...


I started with a whole bunch of 5" squares of fabrics
from a Thimbleberries club hosted by a shop that no longer exists.


These days I gravitate toward brighter, more modern fabrics,
but I'm still deeply in love with
these little basket blocks.


Even the name is cute...Postage Stamp Baskets!
In 1976 the USA celebrated its bicentennial,
and interest in quilting and other colonial arts 
experienced a revival.
Eighteen months after the Bicentennial
a 13-cent stamp was issued,
honoring the quilters of America.

{Yes...13 cents...tells you how long ago that happened!}


Years later, Alex Anderson featured this quilt block
on her show Simply Quilts, seen  on HGTV in the 1990's.
That's when I learned to make this block.

You can find Alex's updated video tutorial today
on The Quilt Show website!

A few years ago, I actually assembled
my black and tan basket blocks into this little table topper.

{Did I ever tell you how much I love quilts that are set on point?}


I was just learning to stipple quilt when I made this one,
and it's slightly embarrassing,
yet endearing at the same time.

{I had tension issues...but that's okay.}


My points are cut off more often than not.
When that happens,
I always claim that I did that on purpose,
to make it "primitive".

;)


{I'm going to make up a word for it...primitize.
Say it with me:  I primitized my quilt.}

I've got a second mini-quilt top made,
 this one in shades of green and red.


Won't this be pretty for Christmas?


{Maybe this Christmas???}


Oh.My. This one is really primitized!


I've still got a basketful of basket blocks left...
so I stitched up a few into those primitive pincushions
I mentioned above.

I paired them up with a coordinating 4-patch, for the back.


They are so simple...just stitched together,
with an opening for turning.
Here's how they looked when I turned them right-side-out and
gave them a nice pressing with the iron.


I just added a bit of stuffing and stitched them closed.


I still have a whole bunch left...


What should I make???
More pincushions?


Or use the rest in one more super-scrappy, primitized quilt?


{Now accepting: free advice.}

Pin It

May 15, 2013

Christmas Basket for May

All of my regular visitors know that
and that I'm trying to make at least one


I'm all excited that I combined the two goals
this month, when I created my latest


Even though most of my projects for Christmas 2013
have used Cherry Christmas fabrics,
I strayed away from those prints,
opting instead for a basket that is more Winter-themed.

{No surprise that I love the ice blue and lime green together.}


For the accent on the pocket and the handles,
I stepped out and used one of my beloved Boho Girl prints!
This basket could be used all winter,
and not just for Christmas.


As much as I like the front...
I really adore the back, with the little trees
and children making snow angels!

{These prints are from 12 Joys of Christmas by Sheri Berry, from 2011.}


I really have this pattern down now...
and it's a source of relaxation for me to whip one up.
It's my new go-to gift project, too.

Last week, I needed a lovely
Mother's Day present for my mother-in-law.
She has pretty peach and blue tones in her kitchen,
so I selected some Buttercup prints
by Fig Tree Quilts for Moda.


She loved her present...
maybe she'll use it for eating outside this summer.
It would be great for carrying napkins and utensils.


The back is just as pretty as the front!


I have yet to leave out the pocket detail,
even though that's a suggested design option.


Come back soon...I hope to have at least one more basket project
to show before the merry month of May is over!
Pin It