June 27, 2013

Polka Dot Cafe Apron - Zakka 2.0 Week #4

What's cookin' at your house?
Here at mine,
I've whipped up a little Polka Dot Cafe apron,


Grab a tall glass of sweet tea,
and get ready for a lot of pictures of my version of
the Polka Dot Cafe Apron.

In my humble opinion,
I used some of the cutest fabrics on earth,
from Lori Holts' Bake Sale for Riley Blake.


I decided to use the same print for the center squares on each block.


I love the way they look with my

{Do you see those tiny little spatulas on the green and blue block?}


Shall we "dish" about my likes and dislikes?
Dislikes are always first...

Okay...I haven't seen this mentioned
in anyone else's posts,
but the cutting instructions say to cut 4 of the 
large squares.

Um...there are 5.  The one in the center
is a different print, but the same size
as the four squares around it.


As much as I have joined in the lament that
this book lacks diagrams,
I found this project's piecing diagram to be very confusing.
The instructions said "Sew
in the order shown...," and referred to the figure,
but there were 5 #1's in the diagram.

{I did figure it out, but only because I'm an experienced sewist.}


The templates...oh, I didn't use those.
I measured them in the book and kind of rounded them up a bit
to the nearest 1/4" figuring I could trim them to size.

{I believe she meant to advise using freezer paper for templates, but it didn't come out and say it like that in the description.  Again, it was confusing.}


Oh.My.Gosh.
When I was finished making my blocks,
I barely had anything to trim off, as shown below.
I did not have 1/4" to spare, to preserve any points!!!

{My 1/4" seam can't be THAT far off!  How on earth did the template users manage, I wonder?}


This is one of those projects that looked like
it was going to be quick and easy,
but it took me almost all day to complete.

Maybe it was just because I kept stopping to look at how cute it was!


This is really a time-saving tip, rather than a "dislike"...
I pressed my binding in the same way as I made the apron ties.  
Rather than attach the binding as described,
I stitched it on "taco-style" in just one step,
enclosing the raw edges.

{How about that darling text print?}


I also added a 1 1/2" sashing between the blocks,
so I didn't have to try to line up all those "missing points" I had.


And now for some more of the "likes"...
Obviously,
the blocks themselves are just sooooo sweet!
I love that they are retro-style and allow the fabrics to shine.


I also like that the patchwork pocket
fit just right onto my plain turquoise tea towel!
What a nice shortcut for me!


My most favorite detail is just about the best "like" ever for me!
The sample has a little piece of fabric tape tucked into the side of the pocket.
I didn't have any decorative tape to coordinate,
so I just made a little fussy cut tab.


Would you like to see it really close up???

{I knew you would!}


Someday, I hope to adjust the measurements
to re-create this adorable little block,
points and all.

{If I figure it out, I promise to share!}


Pin It

June 25, 2013

Reunion

One of the best things about summertime
is getting together for picnics, parties,
and reunions of all kinds.

This year our annual Love family reunion 
was extra-special in many ways.
Our aunt Lu and uncle Ralph just celebrated 
60 years of marriage,
so I decided to make them a signature pillow.


I received this great label from Sweetwater this month,
as a member of the Label Crew Club.
It gave me the bright idea for this sentimental gift.


I already had a charm pack from the perfect fabric line:
Reunion, also by Sweetwater for Moda.

{I had only used a little bit of it when I made these
sweet Cathedral Window pincushions
featured in my Blurb book.}


I pulled out the cute coordinating bunting print for the zipper cover
and a basic polka dot blender in gold for the back.

There is a great pillow pattern available from Sweetwater,
but I decided to use
Crazy Mom Quilts.

{I thought we needed a very big pillow...turns out we all have small handwriting in my family.}


I ironed and stitched the label to the center,
then took my pillow top to our family reunion.
Everyone was asked to sign it
with my permanent marker.


Even before the picnic, I had the backing all prepared,

{I used my own little label for my "extra" signature touch.}


The next morning, all I had to do was to
trim the backing to the same size as the top,
open the zipper at least halfway,
and stitch it all together around the outer edges.
Within a few minutes,
I had the pillow cover turned right-side out,
pressed and ready for the 
20" square pillow form.

{The happy couple was delighted to see it in its final form at their surprise anniversary party.}


I didn't quilt the pillow top,
because I didn't want to stitch over the signatures.
Instead I used Pellon ShapeFlex 101 to stabilize the pillow top.
That made it easier to write on, too.


My Friends and Family pillow
made a great sentimental gift for a very special couple
who holds family and friends dear in their hearts.


Pin It

June 12, 2013

Modern Mini Challenge Entry

I am always entering contests...
you've gotta play to win, right?

Here's one that almost anyone can enter!

Ellison Lane is hosting the
Modern Mini Challenge, for the second year in a row.


I know I enjoyed this challenge last year,
when my little mug rug
made it to the finals!


I really love making smaller projects,
like mug rugs...


I kind of had a tough time choosing
which project I wanted to submit.

{Only one entry per person, please.}

I would have definitely chosen my paper-pieced
made from the awesome tutorial


However, the entry has to have been made within the past 6 months.

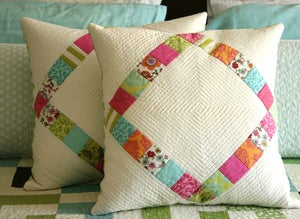
That's when I decided to enter my From The Heart pillow.
For me, the challenge was to take some ideas
from others, add my own,
and end up with something that reflects my own
personal style and sense of design.


I used the tutorial found at Bijoux Lovely,
to create the herringbone block.
Then I made a pretty heart-shaped pattern
and cut out my applique.


I fused it to my background
and blanket-stitched it in place.
I quilted a casual stipple design all over the center...


then added straight-line stitching for the borders.


The back was finished using my own tutorial,
with a covered zipper.


Valentine's Day is only once a year,
but, maybe because my maiden name was Love,
I think this pillow works any day!


you'll leave with a smile on your face!
Pin It

June 11, 2013

Week #2 - Zakka 2.0 Let's Do Lunch!

All over blogland,
sweet peppers have been popping up,
thanks to the Patchwork, Please Zakka 2.0 sew along!

Even though this was a fairly straightforward project,
I was amazed at the variety and innovation
people put into it.

{Hop on over to Lindsey's blog, and then to the Flickr group, and you'll see what I mean!}

My photo even made Explore on Flickr!
I can't wait to see what happens this week,
with the Breakfast, Lunch and Dinner towels.

{Here's my contribution:  LUNCH!}


My sister Susie gifted me with a piece of cotton toweling
by Moda, finished off on the side edges
with a pretty vintage green stripe.

Source:  Quilter Studio
I just knew it was perfect for this project!
I chose some 30's repro scraps and a few other favorites
and went to work.

The pattern calls for enlarging the letters in the words,
but my toweling was only 16" wide,
so didn't enlarge any of the templates,
including the adorable salt and pepper shakers.

I followed the directions provided, with success.
When the salt and pepper shakers were done,
they looked a wee bit like girls in dresses, to me.
Luckily, I had some text prints on hand,
for the finishing touch!

{Ta-da!}


Now, you may know I love me some ricrac!
Ayumi added such a darling detail, using ricrac
for a little hanger up in the corner of the towel.

Instead, I decided to use a 2" x 6 1/2" scrap of
my precious sunshine yellow
Recipe for Friendship fabric,
to make my little hanger.


I used the same print for the towel binding.
I only had to finish the top and bottom edges of my towel,
so this was a really quick and fun project,
and it used minimal fabric.


Now for my likes and dislikes...dislikes are first:

Let me just reveal to you now that I'm a tightwad
when it comes to fabric...and everything else, I guess.
There is just no way I'm going to use
the amount of LINEN that is suggested,
for making even one towel.

{Much as I love the look, I just can't do that!}

Not only that,
I prefer using cotton tea towels, except for drying glassware.
If I hadn't had this awesome piece of Moda toweling,
I would have used one of the cotton towels

{They come in all different colors, and would be great 
for this project...and not so expensive.}


And my "likes" are numerous this week...
I just love this project in general, 
for its gift potential and versatility.  
I can visualize these vintage-style shapes decorating
lots of other kitchen items, too!

{How about some hot pads with the salt and pepper shakers?}


Fusible applique is such a fun and useful technique,
and I always feel a sense of success using this method,
even in shapes and letters with sharp curves.
The way these tiny scraps can add up to something so pretty
never ceases to amaze me.

I especially loved the method Ayumi described for attaching the binding.
I had no problems securing the edging neatly.


My new LUNCH towel is so sweet and sentimental.
It reminds me of all the special kitchens of my childhood...
all of my grandmas and my great-grandmother
were fabulous cooks.


I'm pretty sure I'm going to have to buy some more toweling
and finish the set!


Pin It